How to Build a Floating Deck Over Grass or Uneven Ground
Strong 8k brings an ultra-HD IPTV experience to your living room and your pocket.
Not every backyard is perfectly level—and that’s okay. Uneven ground and grassy areas shouldn’t stop you from building the outdoor retreat you’ve been dreaming of. The good news? You can still learn how to build a floating deck even if your yard isn’t flat. With a little planning and a few smart techniques, you can create a sturdy and stylish space right where you want it.
At San Diego Home Remodeling, we help homeowners turn tricky outdoor spaces into beautiful, usable areas. Whether you're working with a bumpy lawn, sloped terrain, or patchy grass, this guide will walk you through the process of building a floating deck that works with your yard—not against it.
Why Floating Decks Work for Uneven Ground
Floating decks are built on top of the ground rather than being attached to your home or supported by deep posts. That makes them ideal for uneven or grassy areas because you don’t need to dig or level the entire yard. You simply create a stable, elevated platform that "floats" above the surface, supported by deck blocks or pavers.
This flexibility makes it easier to work with the land you already have—and it also means your deck can be placed just about anywhere.
Tools and Materials You’ll Need
Before getting started, make sure you have the following:
- Pressure-treated lumber for the frame and decking
- Concrete deck blocks or paver stones
- Gravel for drainage
- Shovel and rake
- Circular saw and power drill
- Level and measuring tape
- Landscape fabric (optional)
If you're new to DIY or have limited tools, hiring pros like our local handyman services San Diego can help get your project started with the right foundation and framing.
Step-by-Step Guide: How to Build a Floating Deck Over Grass or Uneven Ground
Step 1: Mark Your Deck Area
Start by choosing your deck’s location. Use stakes and string to outline the size and shape you want. Then use a level to identify which parts of the yard are uneven and by how much. A little slope is okay, but anything too steep may require extra leveling or shorter leg supports.
Step 2: Clear and Prepare the Ground
Remove any grass, weeds, or roots in the area where your deck will sit. Rake the soil as smooth as possible. If the ground is especially uneven, you may need to dig out high spots or build up low ones with gravel.
Laying landscape fabric helps prevent weeds from growing underneath your new deck. Cover it with a thin layer of gravel to improve drainage and create a more even base for your deck blocks.
Step 3: Place Deck Blocks or Pavers
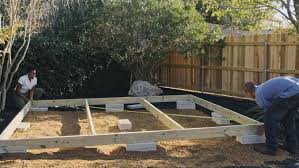
Use concrete deck blocks or paver stones to support the frame. These should be placed at each corner and along the sides, forming a grid. The key to building on uneven ground is adjusting the height of each block or adding gravel beneath them until your base is level. Take your time here—it will make the rest of the build much easier.
Use a long level to check that all deck blocks sit evenly across the entire space. A level foundation means a stable and safe deck.
Step 4: Build and Set the Frame
Construct a rectangular frame using pressure-treated lumber. Attach the corners tightly with screws. Then add joists every 16 inches to provide support for the decking boards. Place the frame onto the leveled deck blocks, checking again to ensure everything is straight and stable.
If your yard’s slope is significant, you may need to cut some legs or add wood shims beneath certain corners to even things out.
Step 5: Install Deck Boards
Once your frame is solid and level, lay the decking boards across the top. Leave small gaps between boards for drainage. Secure each board with deck screws. Use a circular saw to trim the ends so the edges line up cleanly.
This is where your floating deck begins to take shape—and you’ll be able to see your backyard transformation in real-time.
Step 6: Sand and Seal
After all boards are secured, sand any rough edges and inspect for loose screws. Then apply a deck sealer or outdoor wood stain to protect it from moisture and UV damage.
At San Diego Home Remodeling, we offer professional painting services for decks that not only protect your wood but enhance its appearance. A weather-resistant finish will help your deck last longer and keep it looking great all year long.
Tips for Long-Term Durability
Even though your deck is built over grass or uneven ground, proper maintenance is essential. Clean it regularly to remove debris, check for moisture buildup, and reapply sealant as needed. If you ever notice signs of settling or wobbling, you can easily adjust or replace individual deck blocks without rebuilding the entire structure.
And if you'd rather have a pro handle those updates, our team at San Diego Home Remodeling is just a call away.
Final Thoughts
Learning how to build a floating deck over grass or uneven ground opens up a world of possibilities for your backyard. You don’t need a perfectly level yard to create a relaxing outdoor space—you just need the right plan, materials, and a little patience.
At San Diego Home Remodeling, we’ve helped homeowners all across the city improve their outdoor living spaces, even in the most challenging backyards. From construction support to painting services and expert advice, we're here to help at every stage of the project.
Now that you know how to build a floating deck on tricky terrain, there’s nothing stopping you from turning that bumpy patch of grass into your favorite place to hang out.
Note: IndiBlogHub features both user-submitted and editorial content. We do not verify third-party contributions. Read our Disclaimer and Privacy Policyfor details.


