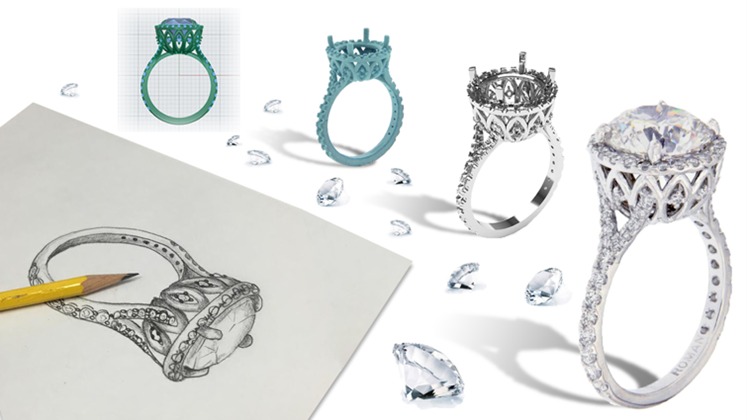
Know how the cad design of a ring is made

Strong 8k brings an ultra-HD IPTV experience to your living room and your pocket.
What Is CAD Design in Jewelry?
CAD stands for Computer-Aided Design. In jewelry making, CAD is used to create a digital design of a ring using special software. This design shows every small detail of the ring before it is made. It helps jewelers see how the final ring will look and make changes if needed. CAD design makes the process faster, more accurate, and allows customers to see their ring before it is made. It is now a very popular method in modern jewelry making.
Why CAD Design Is Used for Rings
CAD design helps jewelers bring ideas to life. Before CAD, designs were drawn by hand, which could take a lot of time and didn’t show a full 3D view. With CAD, jewelers can see the ring from all sides and angles. It also allows for perfect measurements, better stone settings, and cleaner designs. This method reduces errors and makes it easier to change or customize the ring before making it. That’s why most jewelers today use CAD to design rings.
Different Steps of Cad Designing
Step 1: Sketching the Ring Idea
The first step in CAD ring design is sketching. A rough idea of the ring is either drawn on paper or directly on the computer using design software. This sketch shows the shape of the band, the size of the stone, and the overall look. This idea is shared with the customer to get their feedback. Once the sketch is approved, the next step is to create the digital 3D model of the ring using CAD software.
Step 2: Creating a 3D Model on Computer
After the sketch is ready, the jeweler uses CAD software like Rhino or MatrixGold to build a 3D model of the ring. This model is made layer by layer, showing all the details like prongs, stone settings, and engravings. The software helps the designer zoom in and out and view the ring from different angles. This 3D model is an exact copy of how the real ring will look. It can also be changed easily before final approval.
Step 3: Turning CAD into Reality
Once the 3D CAD design is complete, the file is sent to a 3D printer. This printer creates a wax or resin model of the ring. This model is used to make a mold, which is filled with metal to form the actual ring. After casting, the ring is cleaned, polished, and the stones are set. The final ring matches the CAD design perfectly. This process makes ring-making faster, more accurate, and allows for easy customization.
Conclusion:
CAD design is changing the way rings are made. It helps jewelers and customers work together to create the perfect design. From a simple sketch to a finished ring, every step is done with care and accuracy. Whether it’s a custom ring or a new style, CAD makes it easier to turn a dream ring into reality.
Note: IndiBlogHub features both user-submitted and editorial content. We do not verify third-party contributions. Read our Disclaimer and Privacy Policyfor details.


