Ready To Fix Your Toilet? Here's Your Step-By-Step Guide
-

- August 23rd, 2025
- 622 views

Strong 8k brings an ultra-HD IPTV experience to your living room and your pocket.
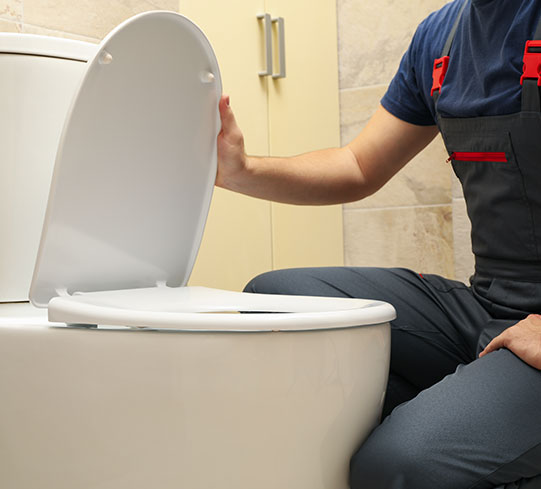
Have you ever been looking at a toilet that wouldn't work and not knowing what to do? You're not by yourself! Fixing a toilet might seem daunting, but with the right tools and a bit of know-how, you can become a DIY plumbing pro in no time. Moreover, the best toilet repair services in gulf breeze fl can save you time and money in the long. This guide will walk you through the essentials of toilet repair, ensuring you're equipped to handle common issues like a true handyman—or handywoman!
Tools You'll Need Before Getting The Best Toilet Repair Services In Gulf Breeze FL:
Before you dive into toilet repair, gathering your tools is essential. Here's what you'll need:
- A pair of gloves
- An adjustable wrench
- A screwdriver
- A replacement kit for the parts you suspect are faulty (like a new flapper or valve)
So, each tool plays a pivotal role. For instance, the wrench helps loosen and tighten fittings, while the screwdriver is crucial for adjusting different components inside the tank.
What's Inside Your Toilet Tank?
Let's start with a peek inside your toilet tank. Did you know the average toilet tank mechanism has about 15 different components? However, only a few of these parts are often the culprits of common toilet problems. Inside, you'll find the fill valve, the flush valve, and the flapper. These parts control the water flow and ensure your toilet flushes smoothly. 90% of toilet troubles are linked to these components when things go awry. However, if your toilet keeps running, the flapper will likely not close right. On the flip side, if the tank isn't filling, the issue might be with your fill valve. Armed with this knowledge, you can pinpoint problems faster and more accurately.
Replacing The Flapper:
Ready to get your hands dirty? Let's tackle the most common issue: a faulty flapper. To begin, turn off the water in your toilet. Most of the time, the valve is near the bottom of the tank. Therefore, turn it around so the flow stops. You should then flush your toilet to get the water out of the tank. Take the chain off of the old flapper and lift it out. Unhook the old flapper from its chain and lift it out. So, a toilet repair service in Gulf Breeze FL adds your new flapper to the same chain and attaches it to the overflow tube. Furthermore, it's like setting up a small tent for a peaceful camping trip—simple and satisfying!
Adjusting The Fill Valve:
Is your toilet not filling up properly? Replace or fix the fill valve if needed. Locate the fill valve with the water supply off and the tank empty. In addition, it's usually on the left side, connected to a tall, adjustable tube. To adjust the valve, turn the adjustment screw or clip to raise or lower the float. Think of it as tuning a guitar to get the perfect pitch. After making the changes, turn on the water and watch the tank fill up. Once the water level gets just below the overflow pipe, it should stop filling up.
Final Checks And Maintenance:
After replacing parts and making adjustments, checking your work is crucial. After you turn on the water again, watch how your toilet acts. So, ensure everything works correctly by flushing it a few times. There are no leaks? Good job! Do not forget that regular cleaning can stop a lot of toilet problems. Every six months, ensure the parts in your tank are still in good shape. In the long run, this will save you time and money.
How To Figure Out Why My Toilet Is Running:
A toilet that keeps running can be more than just a bother—it can make your water bill go through the roof! Let's look at the fill valve and the flapper to fix this. First, look at the flapper. Water will keep getting into the bowl if it looks old or doesn't seal well. Therefore, add a few drops of food coloring to the tank to check the seal. Do not flush for about 30 minutes. Therefore, it's time to change the flapper if you can see color getting into the bowl.
Next, check the opening that fills the tank. You'll know it's not working if you hear a hissing sound. To change it, turn off the water and flush the toilet to empty the tank. Moreover, the old valve was unscrewed from the tank's base, and the water supply line was cut off. Fit the new valve, reconnect everything, and turn the water back on. So, adjust the new valve according to your tank's water level needs.
Dealing With A Weak Flush:
A weak flush often points to clogged holes underneath the toilet's rim. These small openings can get blocked with mineral deposits over time, reducing the effectiveness of each flush. To fix this, grab a mirror and a small piece of wire. Inspect each hole with the mirror and use the wire to gently clear any obstructions. Therefore, check the water level in the tank after the holes are clean. The flush will be weak if it's too low. Using the float on the fill valve, raise the water level until it's just below the overflow tube's top.
Handling A Leaky Toilet Base:
If you notice water pooling around the base of your toilet, don't ignore it—it could lead to significant water damage over time. The issue might be a failing wax seal under the toilet base. First, turn off the water and flush to empty the tank and bowl. Next, turn off the water flow and loosen the bolts that hold the toilet to the floor. Take care to lift the toilet and put it down. In addition, make sure the new wax seal is perfectly centered when replacing the old one. It's similar to putting a hat on your head; it must sit right to work. So, once the new seal is in place, reposition the toilet, screw it back down, and reconnect everything.
Upgrading Your Toilet's Hardware:
Sometimes, a complete overhaul can refresh an old toilet. Consider replacing the handle, the flush mechanism, and other visible parts. Moreover, this makes your toilet operate more smoothly and updates its look. Choose a handle that matches your bathroom's style, and opt for a modern flush mechanism that conserves water. To replace the handle, simply unscrew it from the inside of the tank and install the new one. For the flush mechanism, follow the package instructions closely. Bathroom repair services in Gulf Breeze FL are aesthetic and functional, making your toilet more efficient and reducing the likelihood of future repairs.
Wrapping Up:
Congratulations! You've just navigated the basics of toilet repair. Not only have you saved money on a plumber, but you've also gained valuable skills that will last a lifetime. Remember, the key to DIY repair is understanding how things work and doing it right. So, choose the best toilet repair services in gulf breeze fl, for the next time your toilet acts up.
Related Posts


Note: IndiBlogHub features both user-submitted and editorial content. We do not verify third-party contributions. Read our Disclaimer and Privacy Policyfor details.