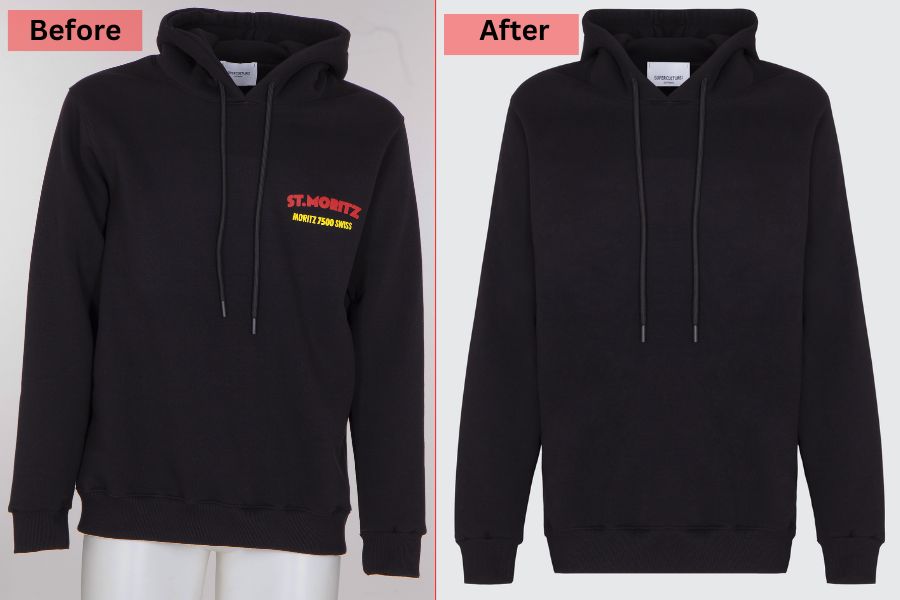
Revolutionizing Fashion Photography with Neck Joint Services

Strong 8k brings an ultra-HD IPTV experience to your living room and your pocket.
In the bustling world of fashion photography, innovation is the key to staying ahead. One such innovative technique is the use of Neck Joint Services. This picture editing feature is a game-changer, particularly for online fashion retailers who seek to present their garments in the most appealing way possible.
But what exactly are Neck Joint Services? Let’s find out so that you can contact the right Neck joint photo retouching company in USA for your requirements.
Understanding Neck Joint Services
Neck Joint Services, also known as Ghost Mannequin or Invisible Mannequin technique, is an advanced photo editing method used in fashion photography. The process involves taking multiple photographs of a garment on a mannequin, capturing both the front and back views.
The editing process removes the mannequin from the images and seamlessly joins the neckline, creating a floating or 'ghost' effect of the garment. This results in a clean and professional image that focuses on the clothing, without any distractions.
Benefits of Neck Joint Services in Fashion Photography
1. Enhanced Visual Appeal: By using Neck Joint Services, photographers can create professional images that highlight the details of a garment. The removal of mannequins allows the buyer to imagine the garment on themselves.
2. Comprehensive Product Display: This technique provides a 360-degree view of the garment. The front and back view of the garment helps the buyer to better understand the look and style of the garment .
3. Improved Online Presence: In the competitive world of online retail, high-quality images can make a big difference for a brand’s image . Neck Joint Services ensure that products are presented in such a way that it attracts more people and increase the sales
Step-by-Step Guide to Performing Neck Joint Services
Here's a step-by-step guide to mastering this technique being followed by experts at Neck joint photo retouching company in USA.
Step 1: Initial Setup
1. Select the Garment: Choose a garment that you want to photograph. Ensure it's clean, well-ironed, and free of any defects.
2. Prepare the Mannequin: Dress the mannequin with the garment, making sure it fits well and looks natural. Adjust the clothing to highlight its features, such as collars and sleeves.
3. Set Up Lighting: Use consistent and even lighting to avoid shadows and color discrepancies. Softbox lights are ideal for achieving a uniform look.
4. Position the Camera: Mount the camera on a tripod for stability and set it to eye level with the mannequin. Capture multiple angles, including front, back, and sides.
Step 2: Photographing the Garment
1. Front and Back Shots: Take clear images of the garment from the front and back. Ensure the garment is centered and fills the frame adequately.
2. Detail Shots: Capture close-ups of intricate details such as buttons, zippers, or unique fabric textures that need to be highlighted.
3. Inside the Neckline: For a comprehensive view, take an additional shot focusing on the inside of the neckline. This image will be crucial for the editing process.
Step 3: Editing Process Using Adobe Photoshop
1. Open Images in Photoshop: Load all your images into Adobe Photoshop.
2. Remove the Mannequin:
- Use the Pen Tool or Quick Selection Tool to carefully select the mannequin and delete it from the image.
- Be precise in your selection to avoid cutting into the garment.
3. Join the Neckline:
- Open the inside neckline shot and overlay it onto the main garment image.
- Use the Layer Mask to blend the neckline seamlessly into the garment. Adjust the opacity and use soft brushes for a smooth transition.
Step 4: Achieving Realism and Professionalism
1. Ensure Consistent Lighting: Adjust brightness, contrast, and exposure to ensure all images have consistent lighting and color tones.
2. Use Precise Selection Tools: Always zoom in and use precise tools like the Pen Tool for clean edges. The Magic Wand Tool might be useful for areas with uniform colors.
3. Refine Details: Use the Clone Stamp or Healing Brush tools to refine any imperfections and ensure a flawless appearance.
Step 5: Final Touches and Exporting
1. Final Adjustments: Perform a final check for any inconsistencies in color or lighting. Adjust as needed.
2. Sharpen the Image: Apply a slight sharpening filter to enhance details and make the garment stand out.
3. Export the Images: Save the edited images in high-resolution formats such as JPEG or PNG, suitable for online store uploads.
Conclusion
Consider an online fashion retailer that specializes in high-end dresses. By using neck joint services, they can present each dress in detail, showcasing unique features like embroidery, fabric texture, and cut. This helps the customer to get a better idea of the product and decreases chances of returns.
Similarly, sportswear brands can use this technique to highlight the functionality and design of their products. By providing a seamless view of their clothing, they can attract people who prefer both comfort and style in their outfit .
If you want to know more about neck joint services, reach out to Global Photo Edit. They offer neck join services, and much more. They also offer the best cloth photo color replacement services.
Note: IndiBlogHub features both user-submitted and editorial content. We do not verify third-party contributions. Read our Disclaimer and Privacy Policyfor details.


