5 Common Mistakes DIY Painters Make and How to Avoid Them

Painting your home can be an exciting and cost-effective way to refresh your space, but many DIY painters run into problems that can lead to subpar results. While the idea of saving money and tackling the project yourself might seem appealing, it's important to consider the potential pitfalls that can occur without the right knowledge, tools, and experience. Whether you’re painting a bedroom, living room, or even your exterior walls, avoiding common mistakes will ensure that your paint job looks polished and professional.
In this article, we will explore five common mistakes DIY painters make and offer tips on how to avoid them. If you want to ensure your painting project goes smoothly and delivers high-quality results, working with painters in Vancouver can save you time, money, and stress in the long run.
1. Skipping Proper Surface Preparation
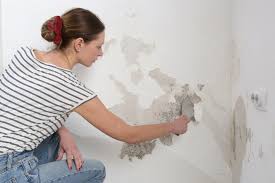
One of the biggest mistakes DIY painters make is neglecting proper surface preparation. Painting over dirty, cracked, or uneven surfaces will cause the paint to peel, crack, or wear away much faster, resulting in a finish that won’t last as long as expected.
Why It’s a Problem:
Dirt, grease, and dust can prevent paint from adhering properly to the surface.
Cracks or holes can cause the paint to settle unevenly, leaving visible imperfections in the finish.
Without sanding or priming, the paint may not cover the surface evenly or may absorb inconsistently, leading to streaks and blotches.
How to Avoid It:
Clean the Surface Thoroughly: Before you begin painting, clean all surfaces with soap and water to remove dirt, dust, or grease. For tougher stains, use a degreaser or specialized cleaner. Allow the walls to dry completely.
Repair Any Imperfections: Fill cracks, holes, or dents with spackle or joint compound, and then sand the area until smooth. This ensures a flawless, even surface for the paint.
Prime the Walls: If you're painting over a dark color, new drywall, or a surface with stains, using a primer is essential. Primer helps to create a smooth base and ensures the paint adheres properly.
If you're unsure how to prepare your surfaces correctly, professional painters in Vancouver can handle all the prep work for you, ensuring your walls are ready for a perfect coat of paint.
2. Using the Wrong Paint Type or Finish
Many DIY painters mistakenly choose the wrong type of paint or finish for the project at hand. Whether it’s using glossy paint for walls instead of trim or selecting exterior paint for interior surfaces, this can lead to poor results that don’t meet your expectations. Each paint type has its own unique characteristics, and selecting the wrong one can compromise the look and durability of your finished job.
Why It’s a Problem:
Wrong Finish: Different finishes, such as matte, satin, eggshell, or gloss, are suitable for different types of rooms. For example, matte finishes can look fantastic on ceilings, but they aren't as easy to clean as satin or semi-gloss paints, which are better suited for high-traffic areas like kitchens and bathrooms.
Wrong Paint Type: Exterior paints are designed to withstand weather conditions and may not be suitable for indoor use. Similarly, using the wrong paint for different surfaces (e.g., using wall paint on cabinets or trim) can lead to suboptimal results.
How to Avoid It:
Know Your Space: Choose the right paint finish for each room and surface. For high-traffic areas, kitchens, and bathrooms, go with a satin or semi-gloss finish for easier cleaning. A flat or matte finish is ideal for ceilings and low-traffic areas like bedrooms.
Choose the Right Paint for the Job: Use interior paints for indoor surfaces and exterior paints for outdoor areas. If you're painting cabinets, trim, or doors, make sure to select a paint specifically designed for those surfaces.
When in doubt, painters in Vancouver can provide expert advice on choosing the right type of paint and finish for your project, ensuring that you get the desired look and durability.
3. Using Low-Quality Brushes and Rollers
Another common mistake is using low-quality or old painting tools. Brushes, rollers, and other equipment play a huge role in the final appearance of your paint job. Poor-quality brushes and rollers can leave streaks, lint, or uneven paint coverage, leading to an unsatisfactory result.
Why It’s a Problem:
Poor Coverage: Low-quality brushes and rollers don’t distribute paint evenly, which can result in streaks or patchy coverage. This means you’ll need more coats to achieve the desired finish, wasting both time and paint.
Brush Streaks or Lint: Cheap brushes shed bristles or leave streaks, and inexpensive rollers can leave behind fibers that stick to the wall.
How to Avoid It:
Invest in High-Quality Tools: A good paintbrush or roller will provide smoother coverage and make your job easier. For walls, a medium-nap roller is ideal for smooth surfaces, while a thicker nap is better for textured walls.
Keep Brushes and Rollers Clean: Clean your tools regularly during your project to prevent buildup and ensure consistent results. If you’re working with multiple coats, wash your brushes thoroughly between uses.
If you’re unsure about the right tools to use for your painting project, painters in Vancouver can guide you in selecting the best tools for the job and provide a flawless finish.
4. Not Applying Enough Coats or Skipping Drying Time
When painting, it's tempting to apply a single coat of paint and call it a day. However, skipping the necessary coats or not allowing enough drying time between layers is a major mistake that can lead to uneven coverage and unsatisfactory results.
Why It’s a Problem:
Uneven Coverage: One coat of paint rarely provides full coverage, especially when painting over a dark color or textured surface. Without a second or third coat, you risk an uneven, patchy finish.
Streaks and Smudging: Skipping proper drying time between coats can cause the paint to smudge or streak. This can also affect the adhesion of the top coat, leading to peeling or fading over time.
How to Avoid It:
Follow Manufacturer’s Recommendations: Always check the manufacturer’s instructions on the paint can for recommended drying times between coats. This will ensure that your paint job has enough time to set properly.
Apply Multiple Coats: Depending on the surface and paint color, you may need two or three coats to achieve full coverage. Be patient and apply each coat evenly, letting each layer dry thoroughly before applying the next one.
To save time and avoid mistakes, many homeowners turn to painters in Vancouver who can complete the project in fewer coats, with professional precision, and the right amount of drying time between layers.
5. Neglecting to Protect Your Furniture and Flooring
Another common mistake is failing to properly protect furniture, floors, and trim. Without proper coverage, paint can drip, splatter, or spill, causing costly damage to your belongings and requiring additional clean-up time.
Why It’s a Problem:
Paint Stains: Unprotected floors, furniture, and trim can become stained with paint, which may be difficult or impossible to remove without causing damage.
Longer Clean-Up Time: Without protective coverings, you’ll spend more time cleaning up paint splatters or trying to remove stains from carpets and furniture.
How to Avoid It:
Cover Everything: Before you begin painting, move furniture out of the room or cover it with drop cloths. Lay down painter’s tape along trim and baseboards to protect these areas. Cover floors with drop cloths or plastic sheeting to catch any paint drips or spills.
Use Painter’s Tape for Clean Edges: Use high-quality painter’s tape to create sharp, clean lines along edges. This ensures that your trim and wall colors don’t overlap, giving your paint job a polished, professional look.
If you're short on time or unsure how to properly protect your home, painters in Vancouver have the expertise and tools to ensure that your furniture and flooring stay safe throughout the process.
Conclusion
While DIY painting can be a rewarding and budget-friendly way to update your home, avoiding these common mistakes is essential for achieving professional-looking results. From proper surface preparation to using the right tools and techniques, taking the time to get things right will make all the difference in the final outcome.
For homeowners who want to ensure a flawless paint job without the hassle, hiring painters in Vancouver can save time and guarantee a high-quality finish. With their experience and expertise, you can rest assured that your painting project will be completed with precision and care, giving you a space that looks fresh, vibrant, and professionally done.
Note: IndiBlogHub features both user-submitted and editorial content. We do not verify third-party contributions. Read our Disclaimer and Privacy Policyfor details.


