How to Convert a Photo to 3D Print: Step-by-Step for Beginners
-

- February 05th, 2026
- 4,297 views

FREE SEO Topical Map Generator: Find Your Next Content Ideas
Have you ever looked at a photo and thought, “I wish I could hold this moment”? With the way 3D printing has evolved, you can now turn a regular picture into something real, a 3D object you can touch, display, or even gift.
Whether you're looking to create personalized gifts or unique home décor, this process is easier than ever. You don't need any modeling experience — just a good photo, the right software, and a little guidance.
Want to convert a photo to a 3D print? In this step-by-step beginner guide, you’ll learn how to do it using free tools, real examples, and expert tips. Whether you're building a lithophane of a cherished memory or crafting something artistic, this article will walk you through the process, from photo to print.
What Does It Mean to Convert a Photo to 3D Print?
At first glance, photos and 3D prints seem worlds apart. A photo is flat — two-dimensional — made up of pixels on a screen or paper. A 3D print, however, is a physical object with height, width, and depth. If you're exploring creative production or prototyping, choosing the best 3D printer for small business can help bridge that gap, turning digital ideas into tangible results.
Converting a photo to a 3D print means turning a flat image into a 3D model by mapping light and dark areas to different heights. One popular method is making lithophanes, where brighter parts of the photo are thicker and darker parts are thinner. When you backlight the print, it creates a stunning, detailed image. Many beginners use Ender 3D printer models for this because they’re reliable and precise for printing such fine details.
The most common file format for 3D printing is STL — a 3D model file that your printer can understand. Once the photo is converted into an STL file, it can be sliced into instructions (GCODE) for your 3D printer to build layer by layer.
You don’t need a fancy setup to turn a photo into a 3D print — just a few basic things:
What Tools Do You Need to Start?
What You’ll Need to Get Started
- A phone or computer — Doesn’t have to be powerful. If it can run a browser and simple apps, you’re good.
- A 3D printer — or access to one. If you don’t have one at home, you can still create your file and use an online printing service to get it made.
-
Internet that won’t drive you crazy — Nothing special, just enough to download the tools and upload your photo
Now, if you're wondering, “Which 3D printer should I even get?” — I had the same question when I started. This 2025 printer guide helped me narrow it down. It’s beginner-friendly and lists a few budget options too.
Tools You Can Use (No Experience Needed)
You don’t need to be a tech genius to turn your photo into a 3D model. There are a few tools I’ve personally tried — and the best part? Most of them are free.
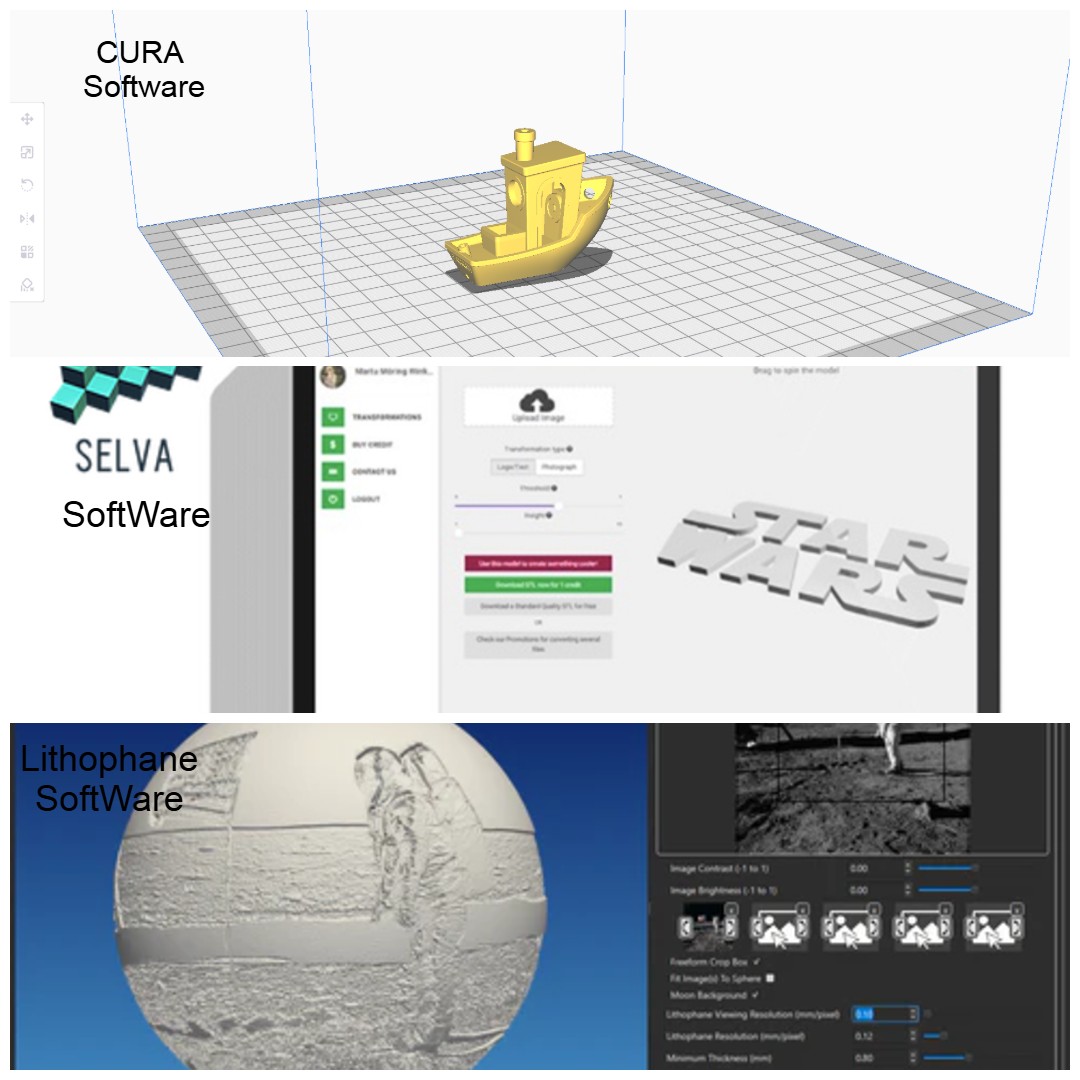
- ImageToLithophane – If you just want to create a simple light-based 3D photo (called a lithophane), this site is a lifesaver. It’s web-based and doesn’t require any installation.
- Selva3D – Upload an image and it turns it into a 3D shape — ready to be downloaded as an STL file. Super simple.
- Cura – This one slices your STL file and preps it for your 3D printer. It’s made by Ultimate and works with most printers.
- Blender – A bit more advanced, but powerful. If you’re curious to dive deeper into 3D design, this is the one pros use (and it’s free)
All of these tools let you upload your photo, adjust how the 3D model will look, and then export a file you can actually print.
Step-by-Step Guide to Convert a Photo to a 3D Print
If you're new to this, don’t worry. You don’t need to be a tech genius to get it done. Here’s the same process I follow whenever I turn a regular photo into a 3D print — whether it's for a gift or just for fun.
✅ Step 1: Pick the Right Photo
This is more important than most people realize. A good print starts with a good photo.
- Go for something clear and high-contrast — dark shadows and bright highlights work best.
- Avoid messy or complicated backgrounds (they confuse the software).
- If it’s for a lithophane, grayscale or black-and-white tends to give the cleanest results.
Bonus tip: Portraits work great. A close-up of a face, a pet, or even a logo with clean lines is usually a safe bet.
✅ Step 2: Upload It to the Converter
Now that you’ve got your photo, head over to a tool like ImageToLithophane or Selva3D. You’ll just upload your image, and the software does the magic in the background.
These platforms basically look at light and dark areas and build depth based on that. It’s easier than it sounds.
If you get stuck or want to see visuals, this photo-to-3D-print walkthrough helped me a lot when I was figuring it out.
✅ Step 3: Tweak the Settings
After uploading, you’ll see a bunch of sliders and options. Don’t let them overwhelm you.
Most tools let you adjust things like:
- Thickness of the print
- Curve or flat layout
- Size and resolution
If you’re new, just leave the settings as-is, or use one of the templates. You can always experiment later once you’ve got the hang of it.
✅ Step 4: Save It as an STL File
Next, click “Export” or “Download” — and you’ll get an STL file. That’s just the 3D model format your printer (or printing service) understands.
It doesn’t look like much at this point, but that file is your blueprint.
Quick tip: Rename it something simple so you don’t lose it later. Trust me.
✅ Step 5: Open It in a Slicer (I Use Cura)
Now it’s time to prepare your model for printing. Open the STL in a slicer like Cura or PrusaSlicer.What does a slicer do? It chops your model into thin, printable layers and converts it into GCODE, which is the actual language your printer speaks.
Here’s what I usually set for lithophanes:
- Layer height: 0.2mm
- Infill: 100% (so the light shines through evenly)
- Supports: Sometimes needed, depending on shape
Preview it first — it'll save you filament and frustration.
✅ Step 6: Print and Watch the Magic Happen
Now the fun part. Load your filament — I usually use PLA because it’s beginner-friendly — and start your print.
Make sure your printer bed is level and that the first layer is sticking well. I usually hang around for the first 10 minutes just to be sure.
Depending on size, prints can take 1 to 5 hours. So, sit back, relax, and let the printer do its thing.
| Step | Tool Name | Free? | Output Form at | Beginner-Friendly? |
| Upload | Selva3D | Yes | STL
|
Yes |
| Edit | Cura / Blender | Yes | GCODE | ⚠️ (moderate skill) |
| Convert | ImageToLithophane | Yes | STL
|
Yes |
Real-Life Ways People Are Using 3D-Printed Photos
🎁 Personalized Gifts
A regular photo frame is nice, but turning a photo into a 3D-printed keepsake? That hits differently. I printed an old picture of my grandparents as a lithophane and gave it to my dad. Let’s just say it didn’t stay on the shelf — he lit it up and put it on his desk the same day.
🏠 Home Decoration
You can turn your favorite photo into a glowing nightlight, a shadow box, or even a piece of wall art that’s one-of-a-kind. It’s a fun way to add a personal touch to your space without spending much.
💼 Small Business & Branding
I’ve also seen small business owners turn their logos or product shots into 3D pieces. It works well for event displays, packaging inserts, or just standing out on social media.
Thinking about turning this into a side hustle? Check out these tips on how to boost your 3D printing business — it’s a solid read if you’re trying to get more clients.
Also, if you're just getting started with printing at home, here’s a beginner-friendly guide to the different types of 3D printers that might help you choose the right one.
Pros and Cons of Photo-to-3D Printing
✅ Pros
- It’s kinda cool to turn your photos into something you can actually touch.
- You don’t need to spend money on fancy software — plenty of free stuff out there.
- Makes gifts feel a bit more special, you know? Like, personal.
- No need to be a tech whiz or anything to get started.
- It’s a fun way to mess around and try out something new.
⚠️ Cons
- If your photo’s blurry or low quality, the print won’t look great — just saying.
- Honestly, you’ll probably mess up a few times before getting it right.
- Some software might confuse you at first, but stick with it; it’s worth it.
- Printing can take forever sometimes, especially if it’s a big piece.
- You might have to do some sanding or fixing afterward to make it look good.
People Also Ask (FAQs)
1. How do I convert a photo to a 3D print?
Pick a good, clear photo, then run it through one of those easy online tools to turn it into a 3D file. It doesn’t take much.
2. What’s the easiest way to convert a photo to 3a D print?
I’ve tried tools like ImageToLithophane and Selva3D; they’re simple to use and don’t take much time at all
3. Can I convert any photo to a 3D print?
Better to use sharp, clear photos; blurry ones don’t turn out great.
4. How long does it take to convert a photo to a 3D print?
Making the file’s pretty quick, it’s the printing that can take a while, especially if the model’s big.
5. Do I need a 3D printer to convert a photo?
You cannot always use your printer or send it to a service.
6. Is converting a photo to a 3D print expensive?
Most tools are free; printing might cost a bit, depending on what you use.
7. Can beginners convert a photo to a 3D print?
Yeah, most tools are made for beginners, no need to be techy.
Final Tips & Conclusion
These days, turning a photo into a 3D print isn’t too complicated. You pick a photo—make sure it’s clear and has some contrast. Then, you throw it into a trusted tool, play around with how deep you want the print to be, and save it as an STL file. After that, load the file into your slicer and set up the printer. Honestly, it might take a couple of tries to get things looking good. But once you nail it, you’ve got this awesome 3D version of your photo. It’s a pretty cool way to bring pictures to life.