How to Install the Eveook System in under 15 minutes
-

- April 01st, 2026
- 3,395 views

FREE SEO Topical Map Generator: Find Your Next Content Ideas
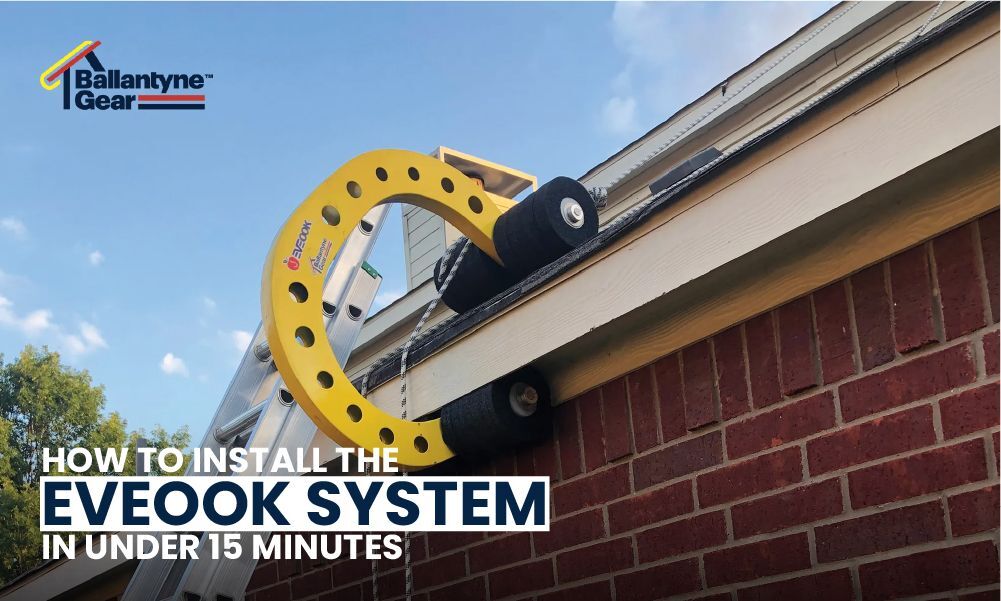
Protecting workers on steep roofs is a challenge—especially when traditional anchor points risk damaging the roof or introducing fall hazards during installation. The Eveook Fall Protection System by Ballantyne Gear solves this by using lightweight, non‑penetrating eave anchors and a tensioned horizontal lifeline. Designed to install in 15 minutes or less, it minimizes installation hazard, avoids roof damage, and supports up to eight users in both fall restraint and fall arrest (ANSI/OSHA compliant)
Why Eveook Installs so Quickly
- No roof penetrations—no time spent welding or screwing hooks into structural members.
- Anchors clamp onto eaves from ladders—not on the roof—so installers stay grounded or ladder‑based.
- A simple throw‑line and pulley technique deploys anchors quickly across the jobsite.
- Equipment is compact and pre‑assembled for rapid use. A complete system includes only two anchors, a throwline, rope, rope protectors, and hardware, configurable by one technician and a helper if needed.
This streamlined design lets trained crews go truck‑to‑roof in minutes, not hours.
Pre‑Installation Preparation (≈5 minutes)
1. Equipment Inspection
Before heading out:
- Confirm each Eveook anchor is intact and swivels freely.
- Check throwline, anchor rope (Maxibraid), rope protectors, pulleys (e.g., Giant), and user gear (harness + self‑retracting lifeline like Goblin).
- Verify the system is ANSI Z359.6 and OSHA CFR-compliant with break-strength beyond 9,000 lb per anchor and 16,000-plus for rope.
2. Site & Ladder Setup
Place two ladders (positioned ~2–3 ft above eaves) on opposite roof edges. Ensure stable placement & safe distance between them (~the width of the roof). Quickly walk the perimeter to confirm no overhead hazards, soffits, vents or obstructions.
3. Personal Protective Equipment (PPE)
Ensure both installers are wearing OSHA‑approved products like helmets, harnesses, gloves, and are trained in fall protection and rescue per ANSI Z359 standards. Training focus: using the system exactly as per instructions, not improvising.
Step‑by‑Step (≈10 Minutes to System Live)
Step 1: Secure First Anchor
📍 On ladder #1, clamp Anchor 1 (Eveook) to the eave bracket without climbing onto the roof. Attach the throwline securely to it.
Step 2: Cross the Roof with Throwline
Launch the throwline across to ladder #2 (or hand it across, depending on width). Clear any obstructions to avoid snags—a quick visual sweep ensures the line lays clear and reachable.
Step 3: Pull Throwline from Opposite Side
The installer on ladder #2 pulls the throwline over. This action brings both the line and anchor rope into position across the roof.
Step 4: Set Second Anchor
While wearing the fall arrester (e.g., Goblin device):
- Attach a progress capture pulley (e.g. Giant) and hang the second Eveook slightly off the ground.
- Climb ladder #2, using the pulley to lift and seat Anchor 2 on the opposite eave.
- Continue pulling rope until horizontal tension is achieved.
At this point, the anchor line is fully tensioned, forming a proper horizontal lifeline.
Step 5: Install Rope Protectors
Place rope protectors at critical roof ridges or caulk lines to prevent abrasion and shear damage to the rope.
Step 6: Final Checks
- Confirm anchor line tension.
- Test the integrity of clamps, attachments, and protections.
- Verify PPE connection points are functional.
- Ensure installers remain tied off throughout any transitions.
Once rope tension and protector placement are confirmed, the system is operational for both restraint & arrest up to eight users.
When well‑practiced, all these steps take ≤10 minutes from ladder setup to a live system.
Safety & Compliance Considerations
- The system is certified to ANSI Z359.6‑2016 and CSA Z259.16‑15, and exceeds OSHA 1910.140 and 1926.502 requirements, with anchor breaking strength >9,000 lb and rope exceeding 16,700 lb tensile strength.
- Installers are protected during every phase, especially while deploying from the ladder—no unprotected exposure on a steep roof.
- Horizontal lifeline plus sliding trolley design avoids dangerous swing fall hazards by keeping users aligned with the line.
- Always complete site‑specific risk assessments, train workers per ANSI Z359.2 in inspection, assembly, and rescue drills, and document each installation per internal or local standards.
Suggested Workflow (Timeline Summary)
| Time | Task |
| 0:00–1:00 | Inspect equipment, harnesses, rope, anchor arms |
| 1:00–4:00 | Set up ladders beneath eaves on both sides |
| 4:00–5:00 | Secure Anchor 1 and attach throwline |
| 5:00–6:00 | Cross the throwline to the opposite side |
| 6:00–9:00 | Pull rope, suspend Anchor 2, climb ladder, seat it |
| 9:00–10:00 | Tension the rope, affix rope protectors, final checks |
| 10:00–15:00 | Crew connection and final inspection before starting work |
Tips to Stay Under 15 Minutes
- Practice frequently—the 15-minute goal is realistic only when teams are trained and rehearsed.
- Pre‑assemble slack rope on the throwline so it's ready for swift deployment.
- Conduct a mock dry run on-site before actual installation to account for anything unique about building width or eave design.
- Keep the throwline and anchor rope free of tangles—coiled, clearly laid out before stepping onto the ladder.
- Ensure ladders are properly positioned—2–3 ft above eave for clean entry and anchor clamp clearance.
- Eliminate obstructions in the flight path of the throwline ahead of time.
System Use & Ongoing Considerations
- After installation, all workers must remain connected to the horizontal anchor line via personal lifelines or trolleys.
- Conduct regular inspections and recertification—at least annual, or after any fall event—as per manufacturer and regulatory requirements.
- Maintain installation documentation: date, personnel, component serial numbers, inspection logs to ensure traceability and compliance.
Train any new or visiting workers on how to connect, use, and disconnect safely—system functionality depends on consistent use of the proper components.
Conclusion
With correct pre‑planning, training, and familiarity, the Eveook Fall Protection System can be installed truck‑to‑roof in well under 15 minutes, making it one of the fastest, safest, and most efficient fall protection systems for steep roofs. Its non‑penetrating design avoids roof damage, and its tested strength and compliance with ANSI/OSHA standards provide robust protection for up to eight users. Combined with consistent inspection, training, and documentation, Eveook offers both speed and safety—maximizing productivity without compromising on safety.