Set Up Netgear EX6400 AC1900: Step-by-Step Range Extender Guide
-
- February 23rd, 2026
- 1,296 views

👉 Best IPTV Services 2026 – 10,000+ Channels, 4K Quality – Start Free Trial Now
The following guide explains Netgear EX6400 setup for the AC1900 Wi‑Fi range extender and covers initial configuration, placement tips, firmware updates, and common troubleshooting steps. This information applies to typical home networks and assumes a standard router and broadband connection.
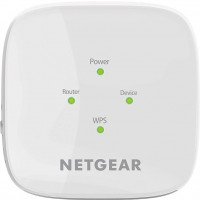
- Netgear EX6400 setup can be completed using WPS or the web setup assistant (mywifiext.local or router IP).
- Important steps: choose a central location, connect via Ethernet for initial setup if needed, update firmware, and secure the extender SSID.
- Common fixes include rebooting devices, checking Wi‑Fi bands (2.4 GHz/5 GHz), and verifying router compatibility with 802.11ac (Wi‑Fi 5).
Netgear EX6400 setup — Quick overview
The Netgear EX6400 setup typically offers two main methods: WPS (Push-Button Connect) for a quick link to the existing router, and the web-based setup assistant for a controlled installation and custom settings. The EX6400 supports AC1900 speeds (combined 600 Mbps on 2.4 GHz and 1300 Mbps on 5 GHz) using the 802.11ac standard. For compatibility and regulatory details, consult IEEE 802.11 specifications and local communications regulators.
Before you begin
Requirements
- An existing Wi‑Fi router and active broadband connection.
- Netgear EX6400 AC1900 range extender and its power adapter.
- Access to the router’s admin credentials (SSID and password) if manual setup is used.
- A computer, tablet, or smartphone with Wi‑Fi or Ethernet capability for configuration.
Placement and compatibility tips
Place the extender roughly halfway between the router and the area with weak signal. Avoid placing the EX6400 near large metal objects, microwaves, or cordless phone bases that can cause interference. Verify the router supports 802.11ac (Wi‑Fi 5) to get AC1900 performance; the extender is backward compatible with older Wi‑Fi devices but will operate at the slower device speeds.
Step-by-step setup methods
Method 1 — WPS (fastest)
- Plug in the EX6400 near the router and wait for the power LED to become stable.
- Press the WPS button on the router (if available) and then press the WPS button on the EX6400 within two minutes.
- Wait for the WPS LED to indicate a successful connection. Move the extender to the chosen location and confirm client devices can connect to the new SSID or the unified network, depending on settings.
WPS does not provide advanced options like custom SSID names or admin password changes; use the web setup if those options are required.
Method 2 — Web setup assistant
- Plug in the EX6400 and connect a computer or mobile device to the extender’s Wi‑Fi network (the default SSID is printed on the device label).
- Open a browser and go to http://mywifiext.local or the extender’s IP address. If that address does not load, try the default router’s admin page or use an Ethernet cable to connect directly to the extender.
- Follow on-screen prompts to scan for the router’s SSID, select the network(s) to extend (2.4 GHz and/or 5 GHz), and enter the router password.
- Choose whether to use the same SSID as the router or create distinct names for the extended bands, then save and apply settings.
- Move the extender to the final location and verify signal strength using LEDs and connected device performance.
Post-setup tasks
Firmware update
Check for firmware updates in the extender’s admin interface. Keeping firmware current resolves known bugs and may improve stability and security. Firmware details and release notes are published by the device manufacturer.
Security and SSID settings
Set a strong admin password for the extender’s web interface. Use WPA2‑PSK (or WPA3 if supported by both router and extender) for Wi‑Fi encryption. If the extender is set to replicate the router SSID, consider naming the extended network clearly if roaming behavior causes confusion.
Troubleshooting common issues
Extender not connecting to router
- Restart both the router and extender. Re-attempt WPS or web setup.
- Temporarily place the extender closer to the router during setup to ensure a strong link.
- Verify router Wi‑Fi is active and the SSID/password are correct.
Poor performance after setup
- Check interference sources and move the extender out of congested areas.
- Ensure the extender is not too far from the router—signal loss between router and extender reduces throughput.
- Confirm the extender is using the correct band for device type (5 GHz offers higher speeds over shorter distance; 2.4 GHz offers better range).
When to seek official help
If problems persist after basic troubleshooting, consult the official product support page for model-specific documentation, warranty, and technical assistance. Manufacturer support pages include user manuals and release notes that can provide model firmware and configuration files.
Official Netgear EX6400 support
Maintenance and best practices
Periodic checks
Periodically reboot the extender, review firmware updates, and confirm encryption settings. Monitor connected devices to ensure expected speeds and reliability.
Network hygiene
Use strong, unique passwords for router and extender admin accounts. Limit guest access and disable features not in use. For regulatory and standards background, see IEEE 802.11 specifications and regional communications authority guidance.
Conclusion
Netgear EX6400 setup is straightforward using WPS or the web assistant. Proper placement, firmware updates, and secure settings help maintain performance. If issues continue, manufacturer documentation and support can provide additional model-specific guidance.
How do I perform Netgear EX6400 setup if WPS is unavailable?
Use the web setup assistant by connecting to the extender’s default SSID, visiting http://mywifiext.local (or the device IP), and following prompts to select the router SSID and enter its password. Alternatively, connect an Ethernet cable from a computer to the extender for initial configuration.
What does AC1900 mean for the EX6400?
AC1900 is a marketing shorthand indicating combined maximum link rates up to about 1900 Mbps across dual bands (approximately 600 Mbps on 2.4 GHz and 1300 Mbps on 5 GHz) using the 802.11ac (Wi‑Fi 5) standard. Actual speeds depend on device capabilities, distance, and interference.
Can firmware updates fix connectivity problems?
Yes. Firmware updates often address bugs, stability, and security issues. Check the extender’s admin interface or the official support page for the latest firmware and follow the provided update instructions carefully.
How can placement improve range and performance?
Place the extender about halfway between the router and the area with poor signal, avoiding obstructions and interference sources. Use the extender’s signal LEDs to test location before final placement.
Is the EX6400 compatible with mesh networks?
The EX6400 is a traditional range extender and does not form a true mesh network with dynamic backhaul management like dedicated mesh systems. It can extend an existing Wi‑Fi network but may not offer the seamless roaming features of mesh solutions.