Universal Charcoal Canister: The Essential EVAP Fix for Every Custom Build
-
- February 27th, 2026
- 412 views

Get a free topical map and start building content authority today.
Informational
Fuel odors in a custom vehicle can ruin the driving experience and signal evaporative system failures. The universal charcoal canister is a compact, widely compatible solution that captures fuel vapors and prevents smells while meeting emissions-control intentions. This guide explains when and how to use a universal charcoal canister, how it integrates with an EVAP system, and practical steps for reliable installations.
Installing a universal charcoal canister prevents fuel odors, reduces evaporative emissions, and simplifies vapor management on kit cars, custom motorcycles, and hot rods. Use the EVAP-FIT Checklist to size, mount, vent, purge, and test any retrofit. Expect a small space and plumbing compromise for a large improvement in cabin air and legal compliance.
Why a universal charcoal canister belongs on every custom build
The universal charcoal canister captures gasoline vapors using activated carbon and routes them to the engine for controlled burning. Custom builds frequently remove factory EVAP components for space or simplicity; that removes vapor containment and causes persistent fuel odors. Adding a universal charcoal canister restores vapor recovery functionality without requiring model-specific parts, making it the most practical way to stop fuel odors and meet local emissions expectations.
How the EVAP system works — key parts and terms
Understanding how a universal charcoal canister fits in requires familiarity with common terms and parts: EVAP system, purge valve, vent valve, fuel tank vent, activated carbon (charcoal), vapor lines, and pressure/vacuum sensors. The canister traps vapors until the purge valve opens and the engine consumes the stored vapors. On custom vehicles, the canister often needs a simple vent and a connection to a purge source.
Related entities and standards
- EPA evaporative emissions guidance and testing protocols
- Onboard diagnostics (OBD-II) purge control logic
- Activated carbon adsorption characteristics
For official context on evaporative emissions and control expectations, refer to the EPA resource on evaporative emissions: EPA — Evaporative Emissions.
EVAP-FIT Checklist: a named framework for canister retrofits
Use the EVAP-FIT Checklist to plan and verify installations. EVAP-FIT stands for:
- Evaluate placement — choose a low-heat, accessible location near the tank
- Verify connections — ensure vapor, vent, and purge ports match hose sizes
- Attach securely — use vibration damping mounts and corrosion-resistant fittings
- Purge strategy — plan a purge source (vacuum line to intake or timed pump) compatible with engine management
- Function test — leakcheck, smoke test, and road test for odor and system operation
Step-by-step: installing a universal charcoal canister on a custom build
1. Choose the right canister and location
Select a canister sized for the vehicle's fuel capacity and expected vapor load. The universal charcoal canister option often includes 3/8"–5/8" ports and a mounting bracket. Mount it low and protected from direct exhaust heat, road debris, and water intrusion, but keep it accessible for inspection.
2. Connect vapor, vent, and purge lines
Run a short vapor line from the tank vent to the canister inlet using fuel-resistant hose. The canister vent should be routed to atmosphere or through a vent filter if required by local regulations. For purge, connect the canister purge port to the engine intake vacuum source or an electronic purge valve controlled by the ECU or an aftermarket controller.
3. Secure, test, and tune
Mount with vibration dampers and check all hose clamps. Perform a pressure/leak test or smoke test on the EVAP lines, then do a road test to confirm odors are gone and the engine runs smoothly during purge events.
Practical tips for reliable odor control
- Choose fuel-resistant hose (EPDM or SAE J30-rated) for vapor lines to avoid degradation and leaks.
- Keep vapor runs short and with gentle bends to reduce condensation and trap points.
- Use a controlled purge source—direct purge into intake tract below throttle body for stable dilution.
- Include an accessible service port for smoke testing and future maintenance.
Common mistakes and trade-offs
While a universal charcoal canister is flexible, several trade-offs and common mistakes exist:
- Incorrect sizing: undersized canisters saturate quickly and stop preventing odors; oversized units can be bulky and harder to place.
- Poor placement: high-heat locations degrade charcoal or fittings; low-clearance mounts increase road-impact risk.
- Improper purge control: constant open purge causes rich running and drivability issues; no purge leads to saturation and odors.
- Legal compliance: some jurisdictions require specific EVAP controls for vehicle inspections—verify local rules.
Real-world example
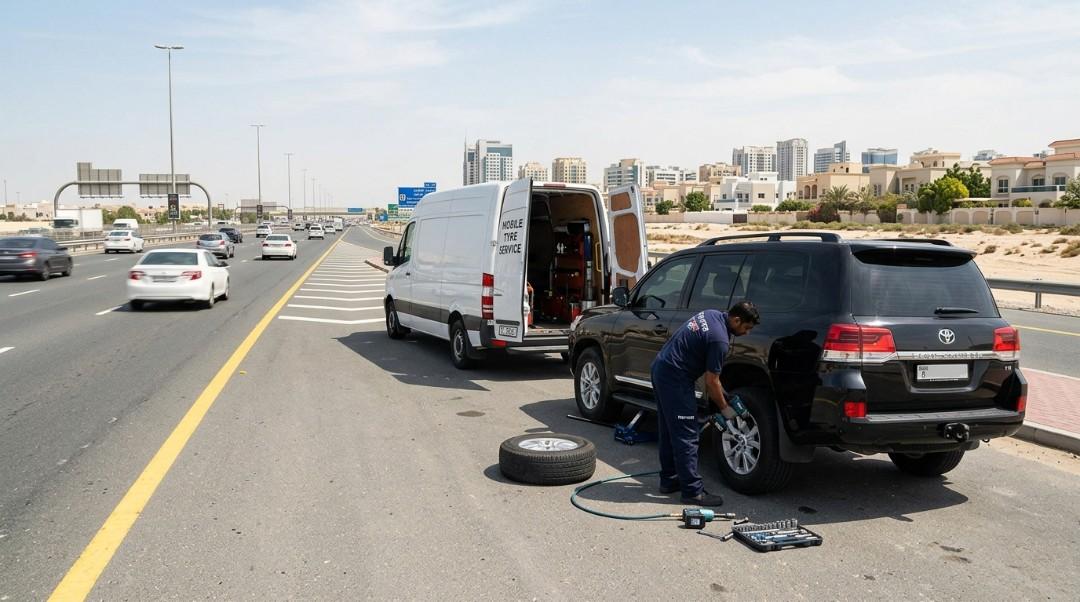
A custom single-seat kit car repurposed a small motorcycle tank and initially vented directly to atmosphere. Persistent fuel smell in the cockpit was solved by installing a universal charcoal canister beneath the rear seat, connecting a short vapor line from the tank and a vacuum-controlled purge to the intake plenum. After EVAP-FIT checks and a smoke test, the cabin odor disappeared and the vehicle passed local emissions visual inspection.
Core cluster questions
- How does a canister stop fuel smells in custom vehicles?
- What size charcoal canister is appropriate for a kit car or custom motorcycle?
- How to route purge and vent lines for a retrofit EVAP system?
- What are signs a charcoal canister is saturated or failing?
- Are universal canisters legal for street use in regulated regions?
Practical maintenance checklist
Inspect hoses quarterly, check for saturation symptoms (strong fuel odor, poor idle after refueling), verify purge valve operation, and perform an annual smoke test. Replace the canister if activated carbon is saturated or contaminated with liquid fuel.
FAQ
Will a universal charcoal canister completely eliminate fuel odors?
When sized and installed correctly with proper purge control, a universal charcoal canister eliminates the majority of fuel odors by adsorbing vapors and routing them to the engine for burning. Persistent smells can indicate leaks, saturated carbon, or improper purge operation.
How to choose the right canister size for a custom build?
Choose based on the fuel tank size and expected vapor volume; manufacturers often provide guidance by vehicle class. For marginal cases, select a slightly larger canister for longer effective life and less frequent replacement.
Can a universal canister be used with carbureted engines?
Yes—carbureted engines can use a canister if the purge is controlled to avoid flooding the carburetor. Direct purge into the intake manifold or controlled vacuum source is recommended rather than unrestricted venting.
What common installation mistakes cause canister failure?
Common errors include poor hose selection, placing the canister too close to heat sources, lack of a controlled purge valve, and not performing leak/smoke testing after installation.
How often should the canister and hoses be inspected or replaced?
Inspect hoses quarterly and perform a full system check annually. Replace the canister if there is persistent odor after testing, visible contamination, or after manufacturer-recommended service intervals.
Adding a universal charcoal canister is a practical, compact way to stop fuel odors and restore EVAP function on custom builds. Use the EVAP-FIT Checklist, perform a proper installation and test sequence, and avoid the common mistakes described to get reliable, odor-free operation.