Adjustable LED Lighting: Practical Guide to Detailing Dark-Colored Cars
-
- March 08th, 2026
- 728 views

Get a free topical map and start building content authority today.
Dark paint hides depth and gloss but also reveals flaws differently than light finishes. Adjustable LED lights for detailing dark cars make it easier to see swirl marks, holograms, and other defects, control reflections, and choose the right color temperature for inspection. This guide explains how adjustable LEDs help, what to look for, and a practical checklist to use during a correction or finishing session.
Adjustable LED lights improve defect visibility on dark paint by letting a detailer change angle, intensity, and color temperature. This enables precise paint correction, consistent gloss checks, and safer polishing. Use the BRIGHT checklist to evaluate gear and follow the practical tips for setup, inspection, and finishing.
Detected intent: Informational
Why adjustable LED lights for detailing dark cars make a difference
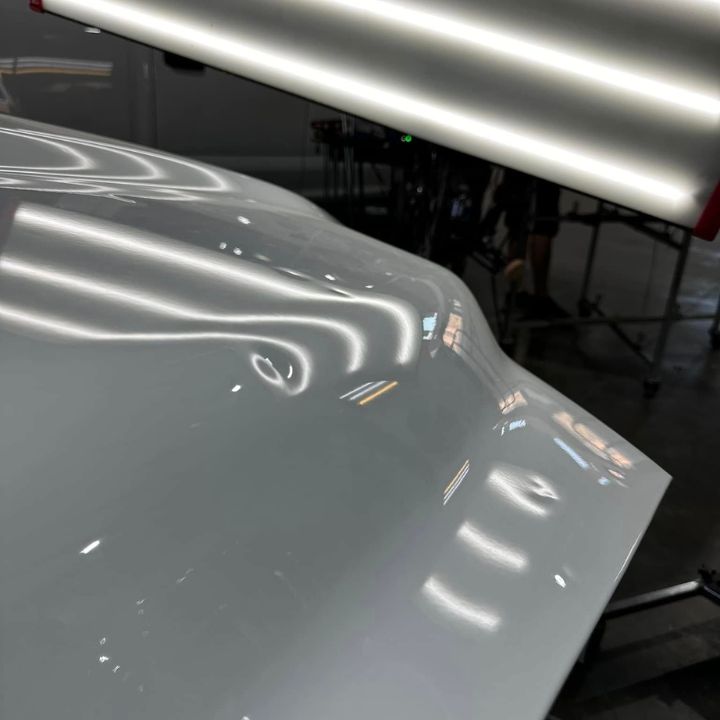
Dark, high-gloss surfaces behave like mirrors: small surface variations create strong specular reflections and can be hard to differentiate from deep defects. Adjustable LED lights let a detailer tune light intensity, angle, and color temperature to reveal low-contrast defects such as micro-scratches, swirls, and orange peel. Using variable illumination reduces missed work and prevents over-polishing, which can thin paint or clear coat.
Key lighting concepts and terms
Understanding basic lighting terms helps choose and use lights effectively. Relevant terms include CRI (color rendering index), color temperature (measured in Kelvin), lux (illuminance), lumens (luminous flux), beam angle, and diffusion. High CRI (80–95+) preserves color accuracy; a neutral color temperature (4000–5500K) typically shows surface defects naturally without excessive warmth or coolness.
For technical reference on lighting metrics and best practices, see the Illuminating Engineering Society: IES.
How adjustable features help in practice
Variable intensity
Lower intensity can reveal subtle texture; higher intensity makes deep scratches and holograms stand out. Being able to dial intensity down prevents glare that can mask fine defects on dark paint.
Adjustable color temperature
Changing color temperature helps reveal different types of defects. Warmer light (3000–3500K) can soften reflections to evaluate uniformity; neutral or daylight-range (4500–5500K) is preferred for inspection and color-matching. The ability to shift color temperature on demand avoids carrying multiple fixed lamps.
Angle and beam control
Adjustable beam angle and movable fixtures let the user create grazing light—critical for exposing low-angle scratches and swirl marks. A narrow beam at a shallow angle emphasizes texture, while a broader diffused beam helps check overall gloss and uniformity.
BRIGHT checklist for selecting and using LED inspection lights
Use the BRIGHT framework during equipment selection and setup:
- Balance: Choose lights with neutral color temperature options (4000–5500K range).
- Rendering: Aim for high CRI (80+) to evaluate color and finish accurately.
- Intensity control: Dimmable output is essential for revealing subtle defects.
- Glare management: Use diffusers or shields to avoid specular hotspots that hide scratches.
- Handling & Heat: Low-heat LEDs and ergonomic mounts reduce risk and fatigue.
- Tilt & Beam control: Adjustable mounts or magnetic bases for precise grazing angles.
Real-world scenario: Correcting a black SUV's hood
Scenario: A detailer inspects a late-model black SUV and sees light swirling under incandescent shop lights. Using an adjustable LED with dimming and 5000K color temperature, the detailer sets a narrow beam at a 15-degree grazing angle to reveal micro-marring. Lower intensity reduces glare and makes fine scratches visible without overexposing the surface. After correction with a finishing polish, a broader 4500K diffused setting checks gloss uniformity across the hood.
Practical tips for setup and workflow
- Start with a neutral 4500–5000K setting for initial inspection; switch to warmer or cooler temperature only to confirm suspicious areas.
- Use a low-angle grazing light (10–20 degrees) to find swirls and fine scratches, then a broader angle to inspect polish uniformity.
- Keep light sources mobile: magnetic bases or tripod mounts make it faster to compare before/after states from the same angle.
- Protect against heat: allow LEDs with higher output to cool or use intermittent operation to avoid softening compound on the surface.
- Document positions: mark lamp positions or take reference photos to ensure consistency when checking after polishing.
Common mistakes and trade-offs
Over-reliance on a single light type
Trade-off: Using only one lamp type (e.g., very cool, high-intensity LEDs) can hide issues visible under different color temperatures. Rotating between temperatures is more thorough.
Excessive intensity and glare
Common mistake: Blasting light too bright creates specular hotspots that mask fine defects and can lead to over-polishing. Use dimming and diffusion.
Ignoring ergonomics and stability
Trade-off: Very bright portable units that lack stable mounts make consistent inspections harder. Choose units with reliable mounting or tripod compatibility to reduce variation between checks.
Core cluster questions
- How does color temperature affect defect visibility on dark paint?
- What CRI level is recommended for car detailing inspection lights?
- When to use a narrow beam vs a diffused beam for paint correction?
- How to set up mobile LED lights for consistent before-and-after comparisons?
- What safety and heat considerations apply to high-output LED detail lights?
Choosing equipment: practical considerations
Select lights with adjustable output and color temperature, a high CRI, and flexible mounting. Many modern inspection lights offer stepless dimming, 3000–6500K adjustable temperature, and magnetic or tripod mounting. Balance budget against long-term needs: higher-quality LEDs cost more but provide better color rendering and longer lifespan, reducing the risk of misleading inspections.
Measuring results: a simple verification routine
Verification routine: 1) Inspect with neutral 4500–5000K light and document locations, 2) use grazing beam at low intensity to map fine defects, 3) perform correction, 4) re-inspect from the same lamp angles and document changes. Matching light angle and intensity for before/after photos improves objectivity and client transparency.
FAQ
Are adjustable LED lights for detailing dark cars necessary?
They are not strictly necessary but are highly useful. Adjustable LEDs improve defect detection, reduce the risk of over-polishing, and save time by making subtle issues visible that fixed lights can miss.
What color temperature is best for inspecting dark paint?
Neutral to daylight-range (around 4500–5500K) is generally best for inspection. Use warmer or cooler temps to confirm ambiguous findings or to evaluate how a finish will look under different lighting conditions.
How important is CRI for car-detailing inspection lights?
High CRI (80+) is important for accurate color and finish evaluation. It helps differentiate surface defects from color shifts and provides a more realistic appearance of the paint under natural lighting.
Can adjustable LEDs damage paint with heat?
LEDs generate less heat than halogen sources, but very high-output units can still warm the surface. Avoid prolonged close contact at full power; use intermittent operation or maintain a safe distance to prevent compound softening or polish sling.
How to photograph defects reliably with adjustable LEDs?
Use the same lamp position, color temperature, intensity, and camera angle for before/after photos. Lock mounts in place and note settings. Consistency in lighting yields verifiable comparisons and helps validate the effectiveness of correction work.