How DIY Hexagon Garage Lights Cut Costs and Boost Style: A Practical Guide
-
- May 06th, 2026
- 481 views

FREE SEO Topical Map Generator: Find Your Next Content Ideas
DIY hexagon garage lights provide an affordable, modern upgrade that balances energy efficiency, task lighting, and visual appeal. This guide explains what makes DIY hexagon garage lights cost-effective, how to plan and install them safely, and which design choices influence both budget and style.
- Detected intent: Informational
- Primary focus: DIY hexagon garage lights — savings, design, and safe installation
- Includes: HEXAGON checklist, cost example, practical tips, common mistakes, and 5 core cluster questions
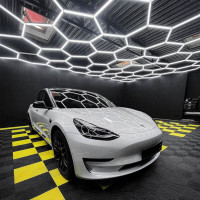
Why DIY hexagon garage lights are affordable yet stylish
Hexagon-shaped LED panels and modular fixtures lower upfront and long-term costs by combining efficient light sources, simple mounting, and adaptable layouts. The geometric form adds contemporary visual interest without custom carpentry or expensive fixtures, while LED technology reduces energy use and maintenance.
Key components and terms to know
Understanding core components avoids surprises during purchase and installation. Important terms include lumens (brightness), color temperature (Kelvin), CRI (color accuracy), driver (power supply for LEDs), junction box, and retrofit mounting. Related entities and standards include the National Electrical Code (NEC) for wiring and ENERGY STAR guidance for efficient lighting.
Standards and safety reference
Follow local electrical codes and use certified fixtures for junction-box mounting. For general efficiency and performance guidance, consult ENERGY STAR lighting information: https://www.energystar.gov/products/lighting_fans/light_fixtures.
HEXAGON checklist: A named framework for planning
Apply the HEXAGON checklist to plan efficient, stylish installs:
- H — Height: Measure ceiling height to select lumen output and beam angle.
- E — Energy: Choose LED modules and drivers rated for low wattage and long life.
- X — eXposure: Account for dust, moisture, and garage chemical fumes when selecting IP rating.
- A — Aiming: Decide fixed or adjustable optics for task zones (workbench, vehicle bay).
- G — Gauge: Verify wire gauge and circuit capacity to avoid overheating (follow NEC guidance).
- O — Optics: Pick diffusers and color temperature (3000K–5000K typical for garages).
- N — Network: Consider motion sensors, switches, or smart controls for savings and convenience.
Practical planning and a short cost example
Budget-friendly planning keeps costs predictable. For a two-car garage (20' x 20') with 8–10 ft ceilings, a typical DIY layout uses six hexagon LED panels providing ~3,000–5,000 lumens each. Example cost estimate:
- Six hexagon LED panels (mid-range): $25–$50 each = $150–$300
- Basic drivers/wiring and mounting hardware: $40–$80
- Switches, motion sensor, connectors: $20–$60
- Tools and consumables (wire, staples, anchors): $20–$40
- Total estimated DIY cost: $230–$480
Compare that to replacing with multiple cans or premium fixtures costing $600–$1,000. Energy savings are realized quickly: LEDs at 50–70W total versus 200–400W for legacy fluorescent or halogen setups.
Step-by-step installation overview
1. Plan layout and circuit capacity
Map hexagon fixture positions for even coverage. Calculate total wattage and confirm circuit breaker capacity and wire gauge per NEC rules.
2. Prepare mounting surfaces and wiring
Turn off power at the breaker. Use junction boxes or retrofit plates. Route wiring with proper connectors and strain relief; ensure the driver is accessible for maintenance.
3. Mount fixtures and test
Secure fixtures to ceiling anchors or struts. Connect driver to fixture and line wiring, then test with a temporary switch. Install sensors or dimmers as planned.
4. Finalize and adjust
Check for glare, shadowing, and aim if adjustable optics are used. Seal any openings and label the circuit for future maintenance.
Practical tips for a successful DIY install
- Measure twice: Confirm spacing and reach for ladders or lifts before buying fixtures.
- Pick the right color temperature: 4000K is a neutral white that suits most garages; 5000K feels brighter for detailed work.
- Use motion sensors or timers to reduce run hours and maximize savings.
- Choose fixtures with easy-replace drivers and accessible mounting for maintenance.
- Label wiring and document the layout for future upgrades or repairs.
Trade-offs and common mistakes
Installing DIY hexagon garage lights offers advantages, but trade-offs exist. Common mistakes include underestimating lumen needs, overlooking proper heat dissipation, and ignoring IP ratings for harsher environments.
Trade-offs
- Upfront savings vs. longevity: Very cheap panels can save initially but may lack quality drivers, shortening lifespan.
- Style vs. task lighting: Decorative clusters look good but may need additional task fixtures for bench work.
- Smart controls add convenience and savings but increase complexity and initial cost.
Common mistakes
- Insufficient lumen planning—results in dim zones and shadows.
- Poor heat management—LED drivers require ventilation to reach rated lifetimes.
- Using incorrect wire gauge or overloaded circuits—creates a safety hazard.
Core cluster questions
- How many lumens are needed for a typical two-car garage?
- What color temperature works best for garage workbenches?
- Can hexagon LED panels be wired to motion sensors and dimmers?
- How to mount hexagon fixtures on uneven or sloped ceilings?
- What are the maintenance steps to extend LED panel lifespan?
Short real-world scenario
A homeowner replaces four old fluorescent tubes (total 240W) with six 35W hexagon LED panels totaling 210W but delivering better light distribution and 40% higher effective lux at bench height. The upfront cost was $320 for parts; annual energy savings estimated at $70–$120 based on 3–5 hours average daily use—payback occurs in 3–5 years depending on local electricity rates.
FAQ
Are DIY hexagon garage lights easy to install for a typical homeowner?
Many homeowners with basic electrical knowledge can install hexagon garage lights safely if local code allows homeowner work. Turn off power at the breaker, use junction boxes, and follow NEC wiring practices. For complex wiring or unfamiliar tasks, hire a licensed electrician.
How bright should hexagon LED panels be for task lighting?
Target 50–75 foot-candles at workbench height for detailed tasks. This typically means a total of 3,000–5,000 lumens per panel in a multi-panel layout for a two-car garage, adjusted by ceiling height and reflector/optics.
What color temperature is best for garage lighting?
Neutral-cool whites (4000K–5000K) balance color rendering and perceived brightness. Use warmer temperatures (3000K) for a cozier feel in combined living/workshop spaces.
Can hexagon LED panels be integrated with motion sensors and smart controls?
Yes. Most LED drivers support inline motion sensors and compatible dimmer circuits. Verify driver compatibility and follow manufacturer wiring diagrams when adding sensors or smart switches.
Do DIY hexagon garage lights save money compared to conventional fixtures?
Yes. Lower fixture costs, reduced energy use, and minimal maintenance typically make hexagon LED panels a budget-friendly choice. Savings depend on fixture quality, usage hours, and control strategy (sensors/dimming).
Related terms and synonyms used: LED panels, modular lighting, lumens, Kelvin, CRI, retrofit, junction box, motion sensors, ENERGY STAR, National Electrical Code.