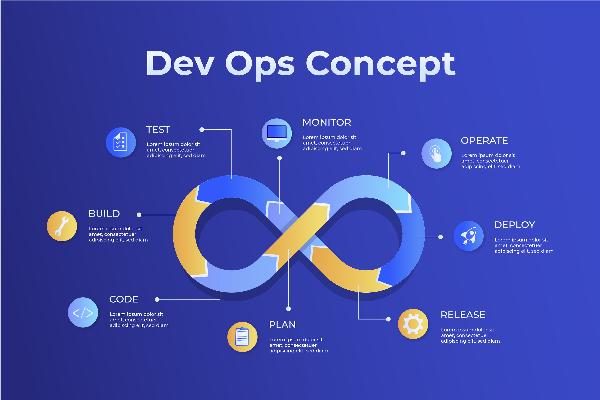
Continuous Deployment with Azure DevOps

Strong 8k brings an ultra-HD IPTV experience to your living room and your pocket.
Introduction
Hey there! If you're diving into the world of software development, you know how crucial it is to get new features, fixes, and updates to users as quickly and reliably as possible. That's where continuous deployment comes into play. Continuous deployment ensures that your code changes go live to production without any manual intervention, streamlining the release process and reducing the risk of errors. Azure DevOps is a fantastic tool to help you achieve this. In this guide, I'll walk you through the steps to set up continuous deployment using Azure DevOps, with a mix of facts, tips, and personal insights to keep it interesting and practical.
The Role of Azure DevOps in Modern Software Development
Azure DevOps is like the Swiss Army knife for developers. It’s an integrated set of tools designed to make your software development lifecycle smoother and more efficient. With Azure DevOps, you get everything you need for planning, developing, testing, delivering, and monitoring your applications. When it comes to continuous deployment, Azure DevOps stands out by offering robust pipelines, flexible repositories, and extensive integration capabilities.
Why Continuous Deployment?
Continuous deployment is all about pushing code changes automatically to production as soon as they pass all tests. This practice is vital in today’s fast-paced development environment because it:
Increases deployment frequency: You can release updates multiple times a day.
Reduces errors: Automated pipelines ensure that only tested and approved code reaches production.
Speeds up feedback: Faster deployment means quicker user feedback, helping you improve your product iteratively.
Setting Up Azure DevOps for Continuous Deployment
Alright, let’s get our hands dirty and start setting up Azure DevOps. First, you’ll need an Azure DevOps account. If you don’t have one yet, you can sign up for free.
Setting Up Your Azure DevOps Organization and Project
1. Create an Organization:
- Head over to the Azure DevOps portal.
- Click on “New organization” and follow the prompts.
- Give your organization a name and choose the region closest to you.
2. Create a Project:
- Once your organization is set up, click on “New project”.
- Enter a project name and description.
- Choose between public or private visibility.
- Select an Agile or Scrum template based on your team's workflow.
3. Create Repositories:
- Within your project, go to Repos > Files.
- Click “New repository”, name it, and choose the type (Git or TFVC).
4. Set Permissions:
- Go to Project settings > Permissions.
- Add team members and assign roles (Contributor, Reader, etc.).
Configuring CI/CD Pipelines with Azure Pipelines
Continuous Integration and Continuous Deployment (CI/CD) are the backbone of modern software delivery. Azure Pipelines makes it super easy to set up these workflows.
1. Create a Pipeline:
- Navigate to Pipelines > Pipelines in your Azure DevOps project.
- Click on “New pipeline” and select your repository.
- Choose “Starter pipeline” or “Existing Azure Pipelines YAML file”.
2. Define the Pipeline:
If you’re starting from scratch, Azure will provide a sample YAML file. Here’s a basic example:
yaml

trigger:

  - main

pool:

  vmImage: 'ubuntu-latest'

steps:

  - script: echo Hello, world!

    displayName: 'Run a one-line script'
3. Build and Test:
Add steps to your pipeline to build and test your application. For instance:
yaml

steps:

  - task: UseDotNet@2

    inputs:

      packageType: 'sdk'

      version: '5.x'

  - script: dotnet build --configuration Release

    displayName: 'Build the project'

  - script: dotnet test

    displayName: 'Run tests'
4. Deploy:
Finally, add steps to deploy your application. This can be deploying to Azure App Service, Kubernetes, or any other environment.
yaml

steps:

  - task: AzureWebApp@1

    inputs:

      azureSubscription: ''

      appType: 'webApp'

      appName: ''

      package: '$(System.DefaultWorkingDirectory)/'
Integrating Source Control with Azure Repos
Source control is the heart of your development workflow. Azure Repos offers Git repositories to manage your code.
1. Clone Your Repository:
Use Git to clone your repository locally.
bash

git clone https://dev.azure.com/your_organization/your_project/_git/your_repo
2. Branching Strategy:
Adopt a branching strategy like GitFlow or trunk-based development. This helps manage features, fixes, and releases efficiently.
bash

git checkout -b feature/new-feature
3. Code Reviews:
- Use pull requests to review code. Navigate to Repos > Pull requests and create a new pull request.
- Add reviewers and ensure that all checks pass before merging.
4. Version Control:
- Keep your commits atomic and descriptive. This makes it easier to track changes and roll back if necessary
Best Practices for Continuous Deployment on Azure
Ensuring Successful Continuous Deployment with Azure DevOps:
Automated Testing and Quality Assurance
Automated testing is non-negotiable for continuous deployment. It ensures that every change is tested before it goes live.
1. Azure Test Plans:
- Use Azure Test Plans to manage your test cases and suites.
- Create test plans, define test cases, and run manual or automated tests.
2. Integrate Testing Tools:
Integrate tools like Selenium for UI tests or JUnit for unit tests into your pipeline.
yaml
steps:
  - script: |
      npm install
      npm run test
    displayName: 'Run UI tests with Selenium'
Managing Infrastructure with Azure Resource Manager (ARM) Templates
Infrastructure as code (IaC) is crucial for consistent and repeatable deployments.
1. ARM Templates:
Define your infrastructure using JSON-based ARM templates.
json
{
  "$schema": "https://schema.management.azure.com/schemas/2019-04-01/deploymentTemplate.json#",
  "contentVersion": "1.0.0.0",
  "resources": [
    {
      "type": "Microsoft.Web/sites",
      "apiVersion": "2019-08-01",
      "name": "[parameters('siteName')]",
      "location": "[resourceGroup().location]",
      "properties": {
        "serverFarmId": "[resourceId('Microsoft.Web/serverfarms', parameters('hostingPlanName'))]"
      }
    }
  ]
}
2. Deploy Templates:
Use Azure CLI or Azure PowerShell to deploy ARM templates.
bash
az deployment group create --resource-group myResourceGroup --template-file azuredeploy.json
Monitoring and Performance Optimization with Azure Monitor
Keeping an eye on your application’s performance and health is vital.
1. Azure Monitor:
- Set up Azure Monitor to track metrics, logs, and traces.
- Create alerts for critical metrics, such as CPU usage or response times.
2. Application Insights:
- Use Application Insights for detailed telemetry on your applications.
- Integrate it with your Azure DevOps pipelines to get real-time insights.
Enhancing Azure DevOps with Professional Expertise
Implementing and optimizing Azure DevOps practices can be a daunting task. Partnering with a professional DevOps service provider can make this journey smoother.
1. Why Partner with a DevOps Services Company?:
- Expertise: They bring in-depth knowledge and experience.
- Efficiency: Accelerate your implementation process.
- Reliability: Ensure best practices and reduce the risk of errors.
2. What to Expect:
- Custom solutions tailored to your needs.
- Continuous support and maintenance.
- Training and upskilling your team.
Final Thoughts
Setting up continuous deployment with Azure DevOps can significantly enhance your development workflow. By automating the deployment process, you can release updates faster and more reliably, ensuring your users always have the best experience. Remember to follow best practices, like automated testing and infrastructure as code, to maintain high-quality deployments. And if you ever feel overwhelmed, don't hesitate to seek help from a professional DevOps services company. They can provide the expertise and support you need to make the most out of Azure DevOps.
Thanks for reading! Hope you liked this guide. If you did, then check out this too: Setting up Continuous Delivery workflow from the Azure Portal
Frequently Asked Questions (FAQs)
1. What is continuous deployment in Azure DevOps?
Continuous deployment is an automated software release process where code changes are automatically built, tested, and deployed to production. With Azure DevOps, this process ensures that every code change passes through rigorous checks before being released, reducing manual errors and speeding up the delivery cycle.
2. How do I set up a continuous deployment pipeline in Azure DevOps?
To set up a continuous deployment pipeline in Azure DevOps, start by creating a new pipeline under the Pipelines section. Connect your source code repository, define the build steps, and configure the release pipeline to deploy the application to your desired environment. Azure DevOps supports integrations with GitHub, Azure Repos, and more.
3. What are the benefits of using Azure DevOps for continuous deployment?
Using Azure DevOps for continuous deployment offers several benefits, including faster time-to-market, improved code quality through automated testing, and enhanced collaboration between development and operations teams. It also provides detailed analytics and monitoring to ensure deployments are smooth and efficient.
4. Can I use Azure DevOps with other cloud services for continuous deployment?
Yes, Azure DevOps supports integrations with various cloud services like AWS and Google Cloud Platform. You can configure your pipelines to deploy applications across multiple cloud environments, allowing for flexibility and multi-cloud strategies.
5. What tools does Azure DevOps provide for monitoring and managing deployments?
Azure DevOps includes several tools for monitoring and managing deployments, such as Azure Monitor for performance tracking and Application Insights for application health monitoring. These tools help you maintain high availability and performance by providing real-time insights and alerts.
Note: IndiBlogHub features both user-submitted and editorial content. We do not verify third-party contributions. Read our Disclaimer and Privacy Policyfor details.


