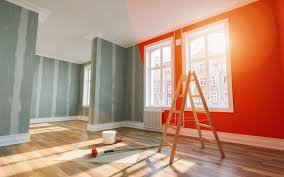
DIY Painting Projects: Common Mistakes to Avoid
-

- August 23rd, 2025
- 373 views

👉 Best IPTV Services 2026 – 10,000+ Channels, 4K Quality – Start Free Trial Now
DIY painting projects can be exhilarating! But while painting may appear easy, painting is actually an art that requires more than a brush and can of paint. Over the years I've learned some valuable lessons (some through trial-and-error). So today, I'm here to share some of the most commonly made mistakes and how you can avoid them when engaging in DIY painting adventures yourself.
No matter your level of experience, avoiding these common missteps will save time, money, and aggravation.
1. Neglecting Prep Work
It can be tempting to rush ahead and see that colourful new coat of paint on the wall right away, but forgoing prepping work is one of the biggest mistakes you can make. Prepping includes cleaning surfaces, patching holes and applying primer - steps which ensure proper adhesion for professional-looking results.
Before beginning painting furniture, take the time to prep first - not only will this produce better results and prolong its longevity but it will also make sure that the paint job lasts as planned! I regret having done otherwise in one instance when trying to save time by skipping primer; only to end up with an uneven and unattractive result! So before picking up that brush to start applying paint, always take the necessary steps in preparation first - not only will you enjoy more consistent and better results from it but it will also last longer and require fewer touches later on when painting!
Tip: Nevis Paints provides high-quality primers that make the task simpler, ensuring smooth, long-term finishes.
2. Applying Inappropriate Paint
Not all paints are created equal, and selecting the wrong kind for your surface could prove disastrous. I once attempted to cover my bathroom ceiling in regular interior paint; within months, the surface began peeling due to excessive moisture levels in my bathroom - lesson learned: always choose appropriate paint for each job!
Nevis Paints provides moisture-resistant paints for areas such as bathrooms or kitchens, while durable enamel or chalk paint may be more suited for furniture and metalwork surfaces. Our selection includes moisture-resistant options from wall to ceiling to furniture and metalwork surfaces - you're sure to find something suitable!
3. Ignoring Weather Conditions
Weather can have a huge effect on any painting project. Too cold or too humid weather conditions could hinder proper drying times, leading to patchy or streaky finishes. With constantly shifting climate conditions in the UK, selecting an ideal time and place for starting is crucial to success.
On a particularly rainy day, I made the mistake of painting outdoors thinking it wouldn't matter much. Unfortunately, however, it did. My paint didn't dry correctly, forcing me to redo everything completely. Since then, whenever painting outdoors in wet or mild weather conditions I always consult my weather forecast and aim for dry days that provide ideal drying conditions.
Pro Tip: Nevis Paints' outdoor paints are designed to withstand Britain's unpredictable climate, but it's wise to check the forecast prior to starting any outdoor painting projects.
4. Overloading Brush or Roller
This is one of the biggest mistakes I see beginners making when using paint, especially rollers. While it can be tempting to load up your brush or roller with as much paint as possible so as to cover large areas quickly, overloading can lead to drips, uneven application, streaking and drips if your application exceeds 1/3rd full capacity. Instead, dip only about one-third into your can and tap off excess onto its side before tapping it out again with your roller - thin layers work far better.
Patience is key when applying thin coats; many thin layers will give a much smoother and professional finish than one thick, heavy coat.
5. Improper Tapping
No matter how steady your hand may be, not using painter's tape around edges, trims, or light switches is always a risk you should avoid taking. I made that mistake once when painting with confidence but ended up spending hours cleaning up afterward when more time could have been saved by adhering more closely.
Purchase high-quality painter's tape for crisp and clean lines and remember to remove it before the paint fully dries if you want your lines to last. Just be careful that any pieces of dried paint don't fall off with it!
6. Neglecting Primer
Primer should be seen as essential when painting any surface - not only fresh drywall! Primer creates a base layer which helps ensure better topcoat adhesion while providing uniform coverage over any stains, dark colours or imperfections in the surface you are painting on.
Once, I made the mistake of painting over a dark green wall with light beige without priming first and realised my error after six coats had dried - had I used primer, it could have cut this number in half and saved both time and paint!
Nevis Paints provides an impressive range of primers designed specifically to cover difficult or dark colours quickly and achieve the ideal finish faster.
7. Not Allowing Paint to Dry between Coats
In an attempt to finish quickly, it can be tempting to apply another coat before the first one has set completely - I know from personal experience this leads to disaster: streaky lines or peeling paint is usually the result. Being patient here is key; check the drying times on your tin carefully, and adhere strictly.
Tip: Take advantage of Nevis Paints' quick-drying formulas to accelerate your project without compromising its quality.
8. Improper Clean-Up
After painting is complete, it can be easy to overlook the importance of proper clean-up. Brushes left lying around can become stiff and unusable; I have personally wasted thousands by failing to properly wash each brush after each use - only later realizing what a money saver this could have been!
Use soap and water when cleaning water-based paints; for oil-based paints use paint thinner or mineral spirits instead. Nevis Paints offers eco-friendly cleaning supplies for an easier post-project clean-up.
9. Selecting an Inappropriate Finish
Selecting the appropriate finish can be just as essential to selecting a color palette. While a flat or matte finish might look fantastic in a bedroom setting, high traffic areas such as hallways and kitchens will require more durable yet wipeable finishes like satin or semi-gloss for optimal durability and cleaning purposes.
After choosing a flat finish for my kitchen, I quickly regretted it after experiencing spillage issues. Now, when making decisions regarding finish options for my home I take both aesthetics and practicality into account.
DIY painting projects can be rewarding experiences, yet can present unique challenges. By avoiding common errors and choosing appropriate products, your next painting project will look professional and last years later. As always, preparation is key and using quality paint makes an enormous difference!
Nevis Paints offers high-quality primers and paints as well as expert advice to assist with all of your painting needs. No matter if it's for interior, exterior, furniture, or outdoor space projects - Nevis Paints has everything needed to ensure success!