Complete Home Studio Music Production Guide for Beginners
-

- March 24th, 2026
- 159 views

FREE SEO Topical Map Generator: Find Your Next Content Ideas
Start here: what home studio music production really requires
Home studio music production requires a reliable signal chain, basic acoustic awareness, and a repeatable workflow. This guide explains how to plan a home studio music production setup that fits limited space and budgets while producing tracks that translate outside the room.
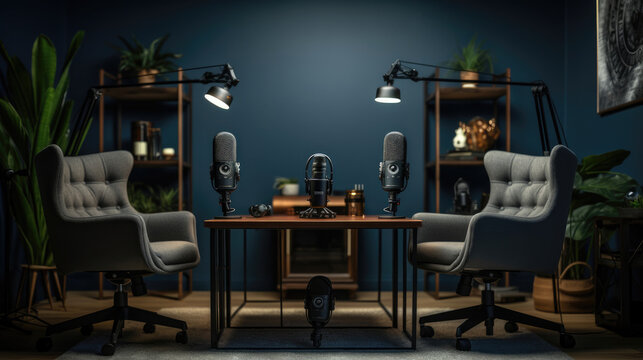
- Essential components: computer, DAW, audio interface, monitors/headphones, microphones, and basic acoustic treatment.
- Follow the SOUND checklist (Space, Orientation, Unwanted noise, Nearfield, Devices) for practical room work.
- Start with clear signal flow, simple monitoring, and one mixing chain; iterate on arrangements and mixes.
Home studio music production: first steps and the essential checklist
Before buying gear, map the intended use: demos, electronic tracks, podcasts, or full instrumental recordings. Use the SOUND framework to evaluate the room and setup.
The SOUND framework
- Space — Measure room dimensions and decide primary recording/listening positions.
- Orientation — Place monitors and desk along short-wall or at symmetrical points to reduce reflections.
- Unwanted noise — Identify sources (appliances, HVAC, street) and reduce them with isolation or scheduling.
- Nearfield — Rely on nearfield monitors or quality headphones to limit room color.
- Devices — List essential devices: DAW, interface, mic(s), headphones, monitors, MIDI controller.
Home recording setup checklist
- Computer with stable storage and a DAW (digital audio workstation).
- Audio interface with at least 2 inputs and low-latency drivers.
- One condenser mic for vocals and a dynamic mic for loud sources.
- Nearfield monitors or closed-back headphones plus acoustic panels at first reflection points.
- MIDI controller, cables, mic stand and pop filter.
Signal flow, gain staging, and practical workflow
Keep signal flow simple: source → microphone/DI → interface preamp → DAW track → effects/plugins → monitor output. Proper gain staging prevents digital clipping and preserves headroom.
Practical steps
- Set preamp so loud passages peak around −12 dBFS in the DAW.
- Record a reference take and check for room tone or noise issues.
- Use light processing while tracking; commit to arrangement and rough balance before heavy mixing.
Choosing gear on a budget and trade-offs
Budget choices trade features for reliability. Prioritize an audio interface with solid drivers over expensive microphones, and choose monitors suited to the room size.
Common trade-offs
- Microphone vs. preamp quality: a decent mic into a clean preamp beats a cheap mic with expensive preamp for most beginners.
- Monitors vs. headphones: monitors reveal stereo and low-end better; headphones help detect detail and avoid room issues.
- Room treatment vs. monitors: modest acoustic treatment improves translation more than upgrading monitors in an untreated room.
Common mistakes
- Ignoring room acoustics — untreated rooms will mislead the mix decisions.
- Overprocessing — applying heavy compression/EQ while recording hides problems rather than fixing them.
- Skipping backups — losing project files stalls progress; use external drives or cloud backups.
Mixing basics for beginners and a simple mix checklist
Mixing starts with organization: label tracks, group similar elements, and build a balance before adding creative effects.
Mix checklist
- Gain structure and clip removal.
- Panning and stereo field mapping.
- Subtractive EQ to remove conflicting frequencies.
- Compression for dynamics control, not loudness chasing.
- Reference with commercial tracks to match tonal balance and level.
Real-world example: four-track demo in a bedroom
A singer-songwriter records guitar DI, acoustic mic, vocal, and a simple synth in a 3.5m x 3m bedroom. Using the SOUND framework, the desk is placed on short wall with absorptive panels at first reflections. An affordable audio interface provides two mic preamps; a condenser captures vocals while a dynamic handles the acoustic guitar. Tracks are arranged, rough-mixed for balance, and simple EQ cuts remove low-frequency mud before adding light reverb. This approach yields a clear demo suitable for online sharing and further refinement.
Practical tips to speed progress
- Save a template in the DAW with routing, basic plugins, and a monitor volume reference to start sessions quickly.
- Use a short reference track when mixing to judge tonal balance and loudness objectively.
- Make incremental changes: apply one EQ or compression tweak, then listen on multiple systems (phones, headphones, monitors).
- Schedule dedicated tracking and mixing days to avoid task switching and decision fatigue.
For acoustic treatment principles and measurements, review guidance from the Audio Engineering Society, which provides standards and technical resources.
Finishing, exporting, and next steps
Export a stereo mix at 24-bit, 44.1 or 48 kHz depending on distribution. Create a mastered version if necessary by applying subtle limiting and final EQ, or use a mastering service for release-quality loudness and consistency.
Next steps
- Practice critical listening and compare mixes weekly to track improvement.
- Learn one mixing concept at a time (EQ, compression, reverb) and apply it across projects.
- Build a small library of presets and templates that match preferred genres.
FAQ
Is home studio music production possible on a budget?
Yes. Prioritize a stable computer, a reliable audio interface, and acoustic treatment. Budget studio equipment can deliver professional-sounding demos when paired with good technique and careful monitoring.
What is the minimum home recording setup for vocals and guitar?
Minimum: a computer with a DAW, a 2-input audio interface, one condenser mic (or dynamic for loud sources), mic stand, cables, and headphones or monitors. Use the SOUND framework to optimize placement and reduce room issues.
How important is acoustic treatment for a small bedroom studio?
Very important. Even a few absorption panels at first reflection points and bass trapping in corners improves mix translation significantly. Treating the room is often more impactful than upgrading monitors.
How to learn mixing basics for beginners effectively?
Study one technique at a time, use reference tracks, and recreate mixes using the same tools. Regular practice and critical listening across multiple playback systems accelerate learning.
What mistakes should beginners avoid when setting up a home studio?
Avoid overbuying gear before confirming workflow needs, neglecting room acoustics, and failing to back up projects. Focus on reliable core gear and consistent tracking/mixing practices.