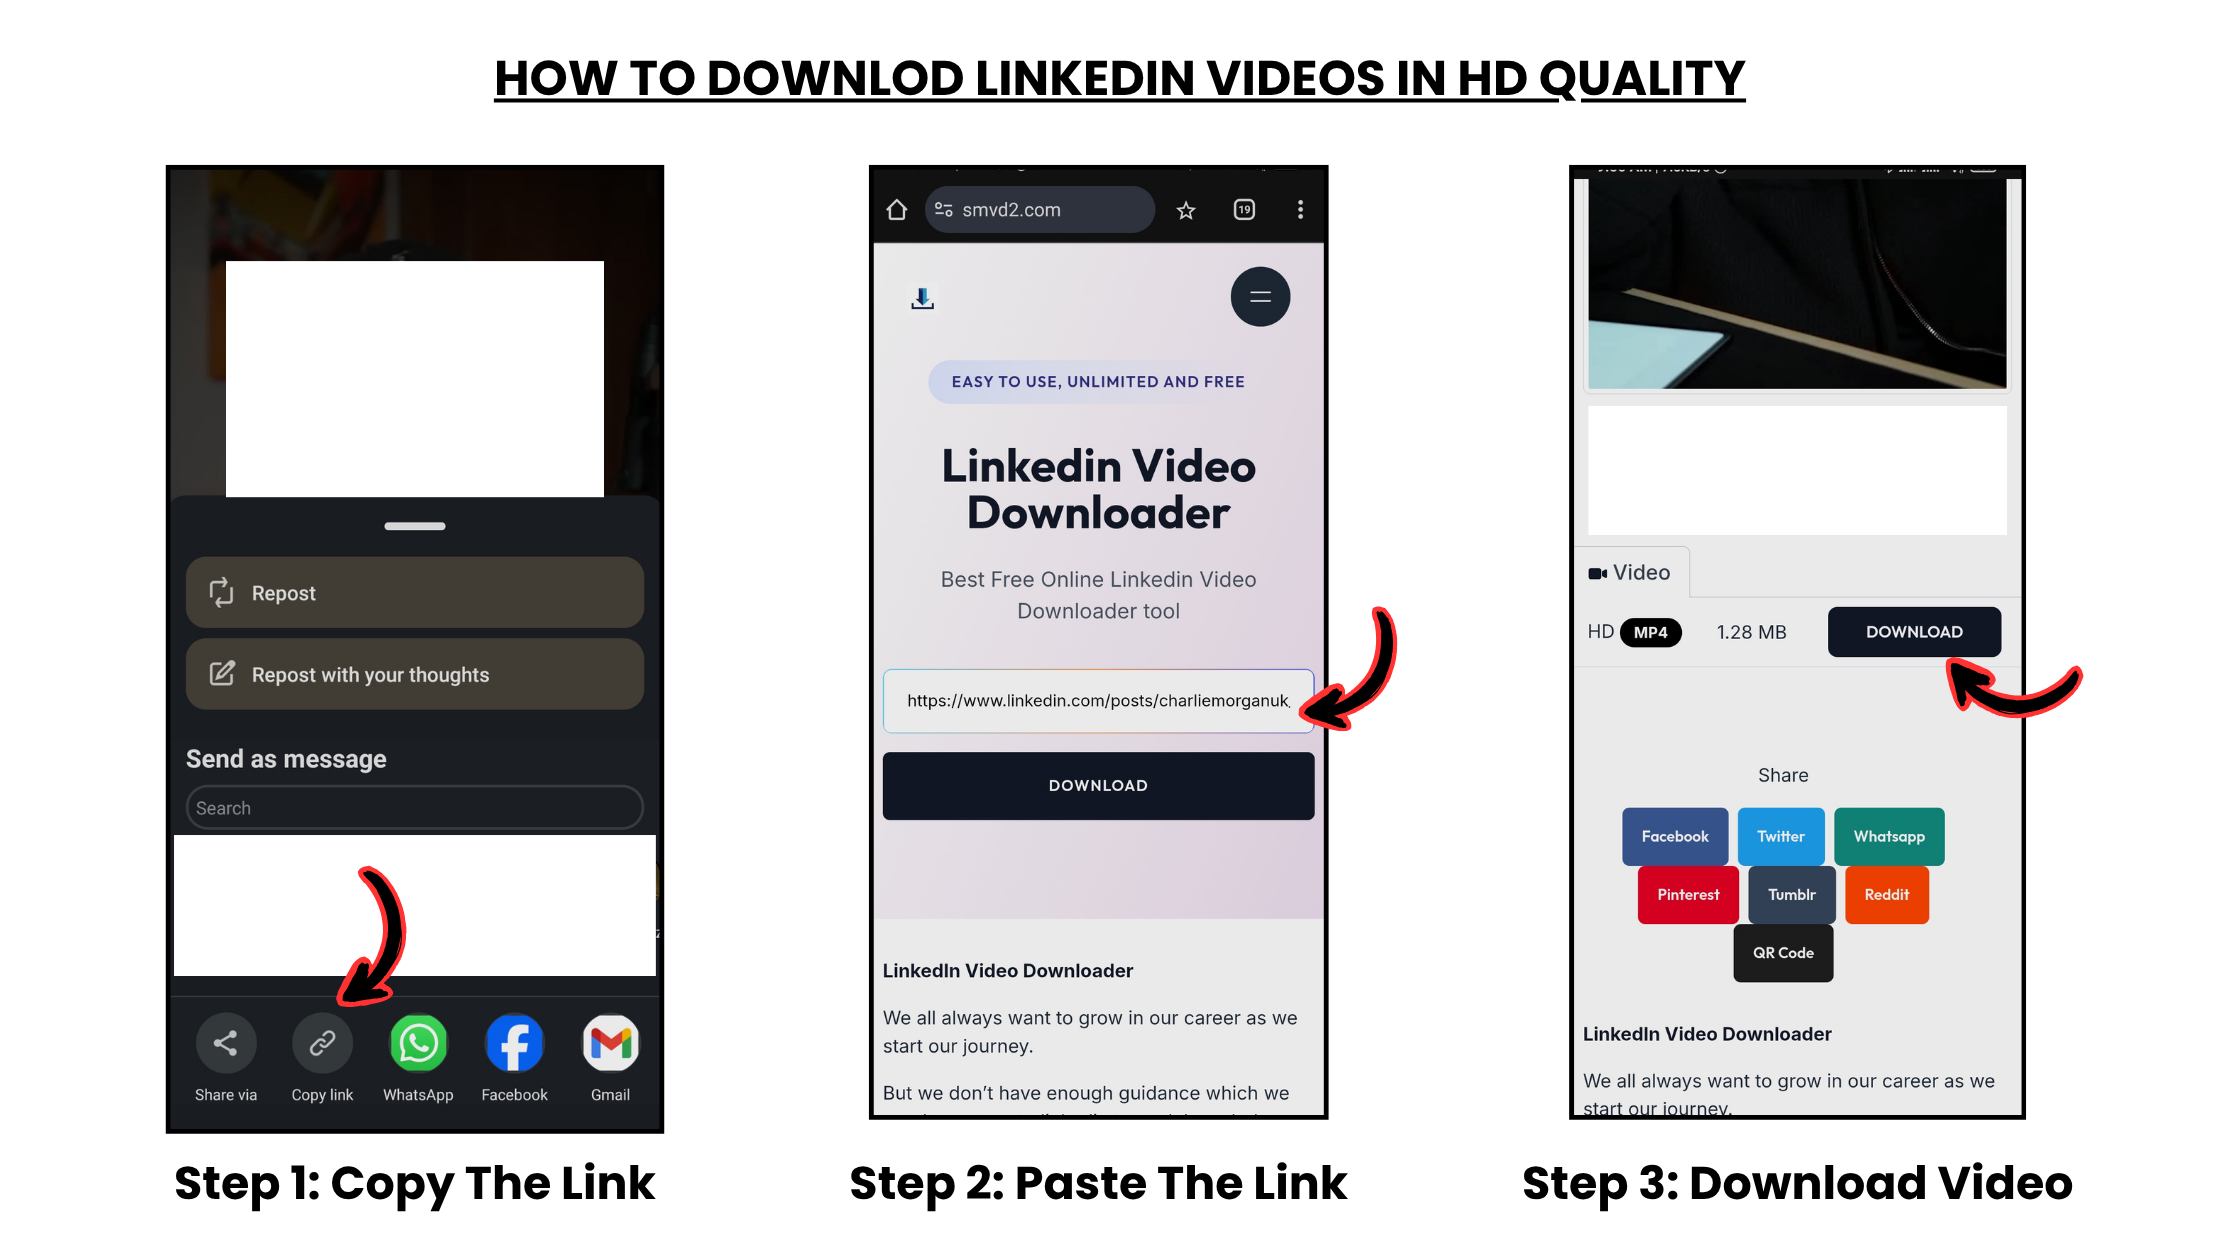
How to Choose and Use a Photo Editing Tool for Social Media and Content Creation
-

- March 25th, 2026
- 134 views

FREE SEO Topical Map Generator: Find Your Next Content Ideas
A reliable photo editing tool for social media is the difference between images that perform and images that get ignored. The right tool speeds up resizing, preserves brand color, and exports images in the correct format for each platform.
photo editing tool for social media: what to look for
Choosing a photo editing tool for social media depends on three practical needs: output fidelity (color and sharpness), speed (batch processing and presets), and export options (formats and aspect ratios for each platform). Look for support for sRGB color profile, non-destructive edits or layers, quick resizing presets, and efficient export queues.
Core features and why they matter
Essential editing capabilities
Key capabilities include crop and aspect ratio presets, exposure and color controls (curves, HSL), selective retouching, text/overlay tools for captions or CTA, and layers or adjustment history. These features enable consistent brand visuals and faster turnaround.
Export, formats, and performance
Export options should include JPEG (for photos), PNG (for transparent overlays), and WebP (for web-first performance). Look for an export queue with size presets for feed, story, and ad placements. Also confirm an option to embed or convert to sRGB, which most social platforms expect.
Workflow acceleration
Batch editing for content creators is critical when publishing multiple variants or preparing a campaign. Presets, synchronization, and automated resizing remove repetitive work and reduce errors.
FRAME checklist: a named workflow for fast, consistent edits
- Format: Set the correct aspect ratio and color profile (sRGB) for the destination.
- Resize: Apply platform presets or set exact pixel dimensions (e.g., Instagram feed 1080×1080, story 1080×1920).
- Adjust: Correct exposure, white balance, and contrast using curves and selective tools.
- Modify: Remove distractions, add branding overlays, or apply masks and retouches.
- Export: Use named export presets and choose format/compression settings for quality vs. file size.
Image sizing and platform rules
image resizing for social channels
Apply exact pixel sizes for each platform and keep a single master file at high resolution to export from. Resize after final edits, not before. When in doubt, choose 1080 px for the smaller side for Instagram; prepare wider or taller options for stories and high-aspect posts.
For accessibility, include readable alt text and ensure text overlays have sufficient contrast. Follow WCAG guidance for alt text and contrast to make images discoverable and usable: WCAG guidelines.
Real-world scenario
A social media manager must publish a product launch across Instagram feed, story, and Pinterest. Using the FRAME checklist: start with a 3000×3000 master, correct exposure and color, create a branded overlay, then use export presets to output 1080×1080 (feed), 1080×1920 (story), and a tall 1000×1500 (Pinterest). Batch export and upload to the scheduling tool.
Practical tips for faster, higher-quality posts
- Use non-destructive edits or save a layered master file so variants are fast to produce.
- Create named export presets for each platform to avoid manual resizing mistakes.
- Keep a consistent brand LUT or preset for color consistency across posts.
- Automate repetitive tasks with batch actions or scripts when processing dozens of images.
- Always preview compressed exports on a mobile device before scheduling.
Trade-offs and common mistakes
Trade-offs
More advanced tools offer greater control (layers, masks, raw processing) but have a steeper learning curve and can slow teams without clear presets. Simpler editors increase speed but may sacrifice fine-grain color control and quality for complex edits.
Common mistakes
- Exporting without converting to sRGB leads to washed or shifted colors on social platforms.
- Applying heavy compression to reduce file size, then losing detail—balance compression and visual checks.
- Editing at a too-small resolution and then upscaling, which reduces sharpness.
- Placing essential text too close to edges—platform cropping can remove it.
How to evaluate options quickly
Build a short test: import a master image, apply a brand preset, create two variants, and export both for feed and story. Time the process and compare file quality on a phone. A good choice minimizes manual steps while preserving the required image fidelity.
FAQ: Frequently asked questions
What is the best photo editing tool for social media?
There is no single best tool; choose based on workflow needs. Prioritize a tool that supports sRGB, export presets, batch editing for content creators, and non-destructive workflows. Evaluate with a short test using your brand assets.
How should images be resized for Instagram, Facebook, and Pinterest?
Use platform presets: Instagram feed commonly 1080×1080 (square) or 1080×1350 (portrait), stories 1080×1920; Facebook recommends 1200 px minimum for shared images; Pinterest favors tall images like 1000×1500. Always keep a high-resolution master and export per-platform sizes.
When should WebP be used instead of JPEG or PNG?
Use WebP for web-first delivery when the platform supports it because it often gives smaller files at similar quality. Use JPEG for photo-heavy posts and PNG for images requiring transparency. If unsure, test visually and compare file sizes.
How does batch editing speed up a content calendar?
Batch editing applies the same corrections or presets across multiple images, reducing per-image setup time. It also enforces consistent color and exposure across a campaign, cutting review cycles.
What accessibility steps should be taken for social images?
Add descriptive alt text, ensure text overlay contrast meets readability standards, and provide text alternatives in captions when necessary to comply with accessibility best practices.