Visit Melbourne Display Homes Before Building: The Practical Pre-Build Guide
-

- March 08th, 2026
- 154 views

Get a free topical map and start building content authority today.
Deciding on finishes, layouts and materials is hard from plans alone — and that's why display homes are powerful. This guide explains what to learn when visiting display homes Melbourne, how to focus inspections, and what decisions to lock in before signing a build contract.
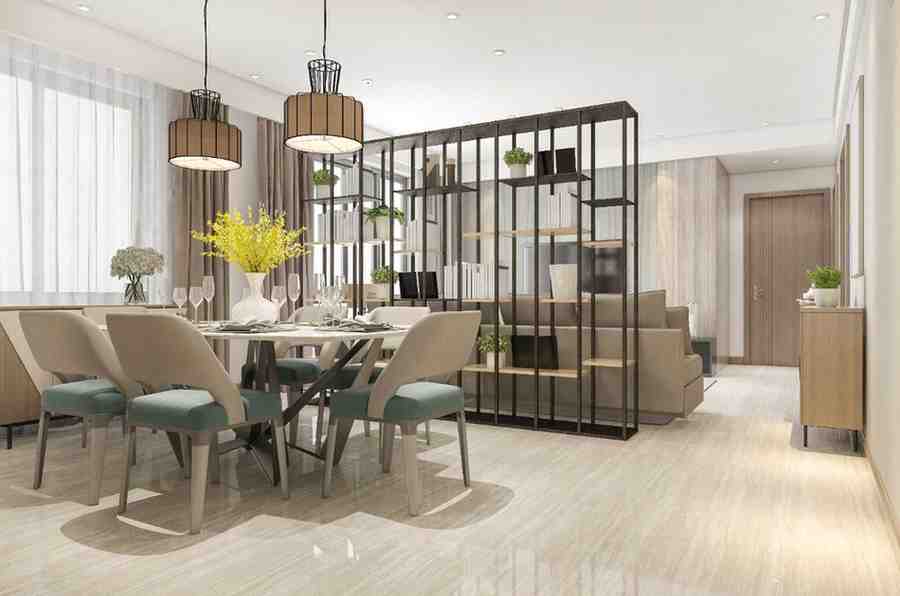
Visiting display homes Melbourne provides tactile insight into spatial flow, finishes, and real-world build quality. Use the PRE-BUILD TACT Checklist, prioritize fixed decisions, and record measurements and examples to bring to your builder. Detected intent: Informational.
Why display homes Melbourne are a pre-build essential
Plans, renderings and virtual tours help, but seeing materials, hearing acoustics and touching hardware reveals details that drawings cannot. A display home visit reduces costly surprises, shortens decision timelines and clarifies upgrade value versus expense. The primary keyword, display homes Melbourne, highlights the local context: planning permissions, climate considerations and common Victorian finishes often differ from other regions.
What to focus on during a visit
Spatial flow and liveability
Walk the paths between rooms at the times of day when the home will be most used. Notice natural light, sight lines from living areas to outdoor spaces, and whether circulation routes are direct or obstructed. Pay attention to ceiling heights, hallway widths and how furniture fits in display rooms.
Materials, fixtures and durability
Touch benchtops, test cabinet closing action and feel floor finishes underfoot. Look for transitions between tile and wood, check grout width and note whether skirting and architraves match the display images. Taking photos with notes helps compare finishes across builders.
Acoustics, insulation and thermal comfort
Ask about glazing types, insulation levels and HVAC specifications. Experience room-to-room sound transfer and whether the display home is staged to mimic real occupancy — staged homes often have additional acoustic treatments that may not be standard.
The PRE-BUILD TACT Checklist (named framework)
Use this checklist on every display home visit to capture consistent evidence and make confident pre-build choices.
- P — Plan fit: Measure and photograph key furniture placements in each room.
- R — Routing: Note traffic flow and access to outdoor areas.
- E — Elevations: Check ceiling heights, step-downs and window sill levels.
- B — Built-in quality: Inspect joinery, hinges, seals and hardware operation.
- U — Utilities: Locate power points, plumbing access and HVAC outlets.
- I — Insulation & acoustics: Ask for specification sheets and feel thermal behavior.
- D — Details: Record colours, textures and supplier names if available.
- T — Timelines & costs: Confirm upgrade lead times and build-phase implications.
- A — Accessibility: Consider aging-in-place features and door widths.
- C — Contracts: Note which items are standard inclusions versus upgrades.
- T — Takeaways: Compile a one-page summary for each visit.
How to turn display-home observations into pre-build decisions
Document findings in a shared folder and rank items by impact and irreversibility. Prioritize fixed decisions that are costly or impossible to change later (structural changes, window locations, ceiling heights). Defer cosmetic choices (paint colour, soft furnishings) until after move-in if budget or uncertainty exists.
Practical tips
- Bring a tape measure, notepad and a smartphone to capture dimensions and finishes.
- Visit at different times (morning/afternoon/evening) to assess light and noise conditions.
- Ask builders for spec sheets and written lists of standard inclusions vs upgrades.
- Compare the same items across 3–5 display homes to understand market norms and premium differentials.
- Request sample packs for finishes where available and keep them with the floorplan notes.
Trade-offs and common mistakes
Visiting display homes can create a bias toward staged aesthetics or expensive upgrades. Common mistakes include assuming all display features are standard and over-investing in non-structural upgrades because they look appealing in a staged environment. Trade-offs often come down to cost versus convenience: a larger island bench may improve useability but increases cabinetry costs and reduces circulation space. Always verify what is included in the base price and how upgrades affect the build timeline and warranty.
Standards and verification
When assessing insulation, glazing and structural elements, refer to the National Construction Code (NCC) and local Victorian guidance for compliance. Builders should be able to supply compliance documentation and energy efficiency ratings. For authoritative information on building standards, see the Australian Building Codes Board: abcb.gov.au.
Real-world example
Scenario: A first-time buyer toured four display homes in a Melbourne suburb. The couple used the PRE-BUILD TACT Checklist, photographing kitchen layouts and measuring space for their existing dining table. One display home showed a sliding pantry door that reduced usable bench space — a detail that was not visible on the plan. By documenting this, the buyer requested a fixed pantry wall in the contract. That single change avoided a post-move renovation and clarified cabinetry costs up front.
Core cluster questions
- When should a buyer visit display homes during the pre-build process?
- How to compare standard inclusions across builders using display homes?
- What should be on a display home inspection checklist before signing?
- How do display homes reveal thermal and acoustic performance?
- Which questions to ask builders about upgrades shown in display homes?
Next steps
Schedule visits with a checklist, record objective measurements and request written specifications for any feature that will be part of the contract. Use the PRE-BUILD TACT Checklist to create a one-page decision brief for the builder and convey must-have items versus optional upgrades.
Do I need to visit display homes Melbourne before signing a build contract?
Visiting display homes Melbourne is strongly recommended. It provides practical insights into spatial layout, finish standards and upgrade costs that plans alone cannot convey. Use visits to confirm contract inclusions and avoid costly assumptions.
What is the best way to compare standard inclusions across different display homes?
Ask for written inclusions lists, match items against the PRE-BUILD TACT Checklist, and compare comparable items side-by-side (e.g., benchtop material, tapware brand, glazing type). Note which items are upgrades and request itemized pricing.
How detailed should a display home inspection checklist be?
Follow a detailed checklist that covers layout, joinery, electrical placements, HVAC outlets, finishes and compliance documentation. The PRE-BUILD TACT Checklist provides a repeatable structure for consistent evaluation.
Can display homes show energy efficiency and building compliance?
Display homes can demonstrate installed systems and visible insulation but always request certification and specification documents for energy ratings and NCC compliance to verify claimed performance.
How should findings from display homes be recorded and used in contracts?
Record measurements, photos and spec references, then present a concise decision brief to the builder. Convert must-have items into contract inclusions or formal change orders with agreed pricing and timelines.