Essential Overland Vehicle Accessories: Practical Guide to Outfitting Your Rig
-
- March 04th, 2026
- 272 views

👉 Best IPTV Services 2026 – 10,000+ Channels, 4K Quality – Start Free Trial Now
Choosing the right overland vehicle accessories transforms a capable vehicle into a reliable, comfortable expedition rig. This guide covers the most useful overland vehicle accessories, explains trade-offs, and provides a checklist and real-world scenario to help plan upgrades without overspending or compromising safety.
overland vehicle accessories: what to prioritize and why
Start projects by prioritizing safety, vehicle compatibility, and mission needs. The most impactful overland vehicle accessories are those that improve load management, recovery capability, power autonomy, and sleeping or shelter systems. Examples include roof racks and mounting systems, recovery gear (snatch straps, shackles, hi-lift jack), dual-battery and power-management systems, rooftop tents or modular sleeping platforms, and lighting and navigation upgrades.
Core categories and secondary considerations
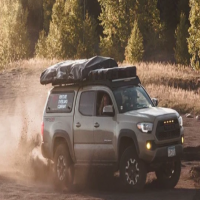
Load and storage systems (roof racks, drawer systems, cargo management)
Good storage systems keep weight low and secure gear. Consider drawer systems for organized access and lockable storage for security. Roof racks enable bulky items but increase center of gravity and fuel consumption.
Electrical and power accessories (secondary batteries, inverters, solar)
Mission-critical electrical accessories include dual-battery setups, DC-to-DC chargers, and solar panels paired with MPPT controllers. These components support fridges, lights, and charging devices without risking the starting battery.
Recovery and suspension upgrades
Recovery gear is essential for remote travel; pair it with suspension upgrades if adding significant payload. Upgrading shocks and springs helps maintain handling and prevents bottoming under load.
Named checklist: GEAR checklist for overland upgrades
Use the GEAR checklist when evaluating accessories: GEAR = Gear-fit, Ergonomics, Accessibility, Reliability.
- Gear-fit: Confirm weight, mounting points, and vehicle load limits match the accessory.
- Ergonomics: Ensure user-friendly access—drawer height, tent entry, switch placement.
- Accessibility: Prioritize items needed on the trail (recovery gear, first aid) over storage-only items.
- Reliability: Choose robust electrical components, sealed connectors, and UV-resistant fabrics.
Practical tips for selecting and installing overland accessories
Follow these actionable tips when planning upgrades:
- Measure and match load limits: Check the vehicle manufacturer’s roof and axle load ratings before adding racks or heavy cargo.
- Modular approach: Add one major system at a time—install a drawer or fridge first, test weight distribution, then add a roof rack or tent.
- Plan wiring paths professionally: Use fuses, circuit breakers, and protected conduit for all electrical runs to reduce fire and fault risks.
Real-world example: Outfitting a mid-size SUV for a 2-week desert trip
Scenario: A mid-size SUV will travel two weeks in remote desert terrain carrying camping gear, food, water, and recovery equipment. Recommended accessories and reasoning:
- Dual-battery system with DC-to-DC charger and 100W portable solar: supports a 40L fridge and communications while preserving the starter battery.
- Drawer system in the cargo area with lockable compartments: fast organization for cooking gear and tools.
- Roof rack with tarpaulin storage for spare fuel and extra water containers: keeps heavy items centralized and off the cabin floor.
- Recovery kit: rated snatch strap, soft shackles, and a quality recovery board. Store within reach for quick access.
- Upgraded shocks and heavy-duty springs: prevent sagging under load and maintain handling on washboard roads.
Common mistakes and trade-offs to consider
Overpacking and weight distribution
Loading too much weight, especially high on the vehicle, raises the center of gravity and increases rollover risk. Trade-off: roof storage versus internal drawers—drawers keep weight lower but reduce cabin volume.
Buying light versus durable
Ultralight gear saves fuel and payload capacity but may wear faster in harsh environments. Trade-off: higher initial cost for heavier-duty gear that lasts longer and reduces field repairs.
DIY installations versus professional fitting
DIY saves cost but can introduce wiring or mounting mistakes. Trade-off: pay for a professional install for complex electrical systems, or accept the learning curve and potential rework with DIY.
Standards, safety, and authoritative guidance
Follow official safety guidance for vehicle loads and electrical safety. For federal safety recommendations related to vehicle equipment and load limits, consult the National Highway Traffic Safety Administration: NHTSA. Referencing standards bodies and manufacturer specifications helps avoid liability and unsafe configurations.
Core cluster questions
- How much weight can a vehicle roof rack safely carry?
- What recovery gear is essential for remote overland travel?
- How to design an overland electrical system with a dual battery and solar?
- What are the trade-offs between rooftop tents and ground tents for overlanding?
- How to choose suspension upgrades for payload and towing?
Practical value: quick installation and maintenance checklist
- Label all electrical circuits and keep a wiring diagram in the vehicle.
- Torque all mounting bolts to manufacturer specs and re-check after the first 100 miles.
- Store recovery gear in a dry, easy-to-reach location and inspect straps and shackles before each trip.
How to budget and phase upgrades
Start with safety and power: dual-battery and recovery gear. Next add storage and shelter that match trip type (short trips favor compact rooftop tents; long trips often benefit from modular drawer and kitchen setups). Phase upgrades across seasons so feedback from real trips informs the next purchase.
Common mistakes to avoid
- Ignoring the vehicle’s Gross Vehicle Weight Rating (GVWR) and axle loads.
- Underfusing electrical components—always size fuses to protect the wiring and devices.
- Buying accessories incompatible with the vehicle’s mounting points—measure twice before ordering.
Next steps and resources
Create a build plan that lists mission profile, required accessories, estimated costs, and installation timeline. Use the GEAR checklist to validate every chosen item and test the rig on short trips before committing to remote travel.
FAQ: common questions about overland vehicle accessories
What are the must-have overland vehicle accessories for safe off-road travel?
Must-have items typically include a recovery kit (snatch straps, shackles, traction boards), a reliable power system (dual battery, charger, solar if needed), secure storage (drawer systems or lockable roof boxes), and adequate lighting (headlights and auxiliary lights with proper wiring and switches). Adjust the list for trip length and terrain.
How do weight and roof-mounted accessories affect vehicle handling?
Roof-mounted weight raises the center of gravity and can increase body roll and braking distances. Keep heavy items low and centered; consider internal storage or drawer systems to reduce rollover risk and improve fuel economy.
How should an overland vehicle accessories plan account for electrical needs?
Plan electrical capacity based on the total amp-hours of fridges, lights, communication devices, and charging needs. Include a safety margin and use proper fusing, battery management, and ventilation for charging equipment.
Are rooftop tents or ground tents better for overland trips?
Rooftop tents provide quick setup and elevated sleeping but add weight and affect handling. Ground tents are lighter and lower cost but require more setup time and may be less comfortable on rough ground. Choose based on comfort priorities and vehicle payload capacity.
How to choose between different overland vehicle accessories brands and components?
Compare specifications, certifications (where available), warranty terms, and documented compatibility with the vehicle. Prioritize robust electrical components, sealed connectors, and tested mounting hardware. Field reports and community forums can offer real-world durability feedback but verify claims against manufacturer specs and standards.