A Techie, Blogger & Entrepreneur by heart. Rahul Gupta is founder of IndiBlogHub.com platform and build multiple streams of income via Blogging.
Written by Rahul Gupta » Updated on: July 06th, 2025

Learn how to start a WordPress blog and create your first website in just 5 easy steps. From choosing a domain name to setting up WordPress, this guide will help you kickstart your blogging journey with confidence
Creating a WordPress site can be an exciting and rewarding experience, but it can also be overwhelming if you're new to the process.
In this article, we'll walk you through the 5 essential steps to create your first WordPress site. From choosing a domain name and web hosting to selecting a theme and installing plugins, we'll cover everything you need to know to get your site up and running quickly and efficiently. By following these steps, you'll be well on your way to creating a beautiful and functional WordPress site that can attract visitors and generate traffic. Plus, we'll provide tips and tricks for optimizing your site for search engines, ensuring that your content reaches the widest possible audience. Whether you're a blogger, business owner, or anyone else looking to create a website, this guide is an excellent resource for getting started with WordPress.
You might be thinking that setting up a blog is a very technical thing. I can't do it as I am not a techie. Guess what – you are not alone. There are thousands of other users who started their blogs without any technical knowledge. Setting up your website looks hard and time-consuming. Surprisingly, it isn't.
WordPress is the best blogging platform for you. It is by far the most used CMS in the World. Approximately 85% of websites on the internet is hosted by WordPress and the best part is that you don't need any technical/coding knowledge to start a blog on WordPress.com. One of the few reasons why it is the best blogging platform:
Yes, you read it right. You can start a blog starting with no outside help in under 30 minutes, and we will walk you through the entire procedure, well-ordered. In this tutorial exercise, we will cover:
Marketing success is all about customer's attraction and retention. Trendy names are an effective way to do both. When consumers are shopping online they often select a seller based on a clever, memorable domain name. Here are some tips for acquiring trendy names:
The biggest mistake you can make naming your new website happens at the very beginning. If you have a name already in mind, while it may be your first instinct to see if the domain name is taken, that’s the last thing you should do. Come at the name from every possible angle, make lists of adjectives and the human qualities you want to emulate.
In most cases, when it comes to finding trendy names, or any domain name that works, shorter is better. Shorter Domain names are easier to remember. However, you might find that three-letter domain names are hard to come by, so keep an eye out for any three- and four-letter ones that fit your business goals.
Aim to include one of your company’s or industry’s keywords in a domain name when possible. Make a list of some keywords to get good google ranking and traffic.
These usually confuse potential customers and look cluttered.
Bluehost is one of the oldest web hosting companies, started in 1996 (that’s before Google). They are also the largest brand name when it comes to WordPress hosting because they host millions of websites over the internet.
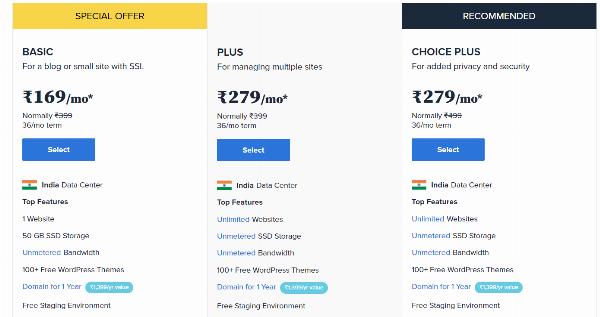
Click here to open Bluehost. Once the page opens. you have to choose one hosting plan as per your need. I would recommend to go with 3 domains(Advanced) as it allows you to add 2 more domains at a very low hosting cost.
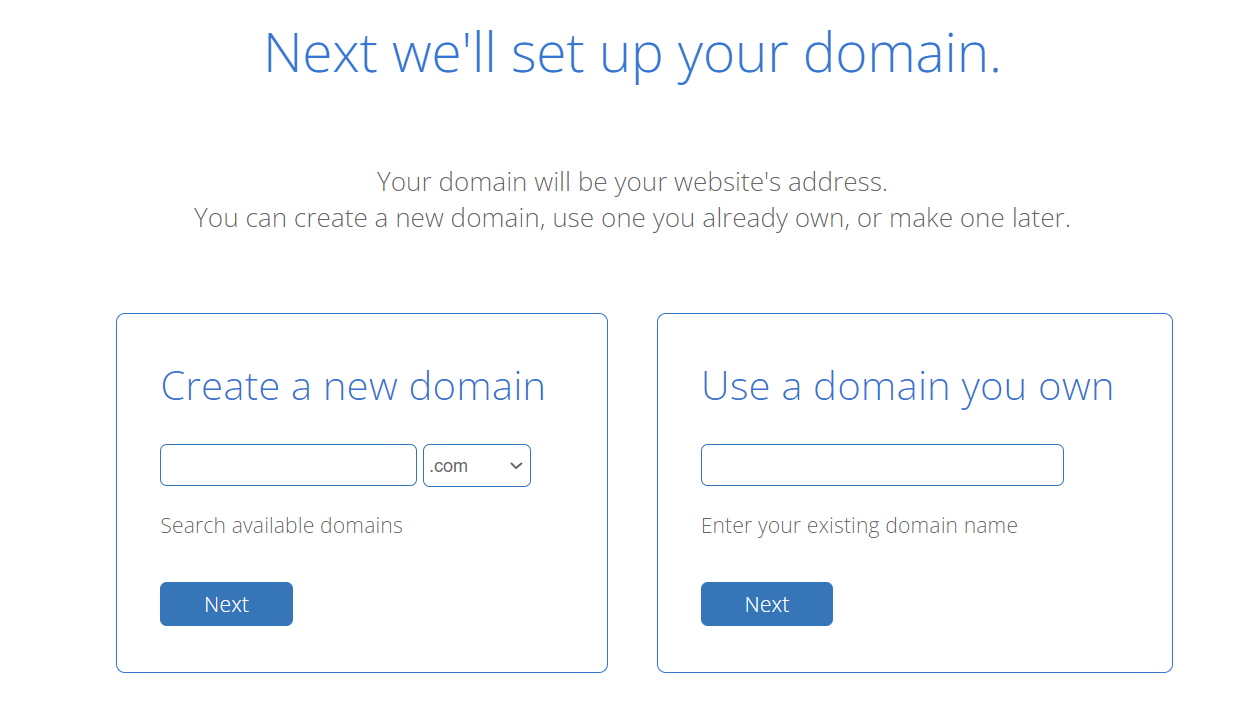
After that, you will be asked to enter the domain name for your website.
At Last, you should include your account data and conclude the bundle information to finish the procedure. On this screen, you will see additional items that you can buy. It's altogether up to you regardless of whether you buy these, yet we, for the most part, don't prescribe acquiring these.
You can simply include them later, in the event that you conclude that you require them.

Once finished, you will get an email with full details on the most proficient method to login to your web hosting control board (cPanel). This is the place you will see everything from support, messages, in addition to other things. Be that as it may, above all, this is the place you introduce WordPress.
"The main Game Starts Now !!!"
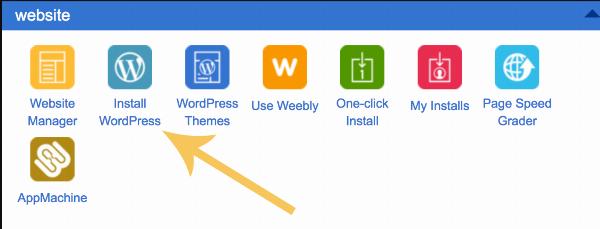
WordPress Installation: In the cPanel, you will see many little symbols for various administrations and components. These are the various CMS softwares where you can manage you blog/website. Look down to the website segment and tap on the WordPress symbol. This is the amazing new software that lets you install WordPress on your host in just a few clicks.
On the following screen, you will be made a request to choose your domain name. Pick the domain from the drop-down and after that tap Next. Then you should enter the Site name, username, and password for your blog/website. You should select all the checkboxes and then tap on Install.
The QuickInstall will begin installation of WordPress. When WordPress is done installed, you will see the success note in the top header bar. Tap the Installation Complete link and wait for a while till it take you to the screen with your Wordpress login URL and your password.
Congrats, you have made your WordPress site. Your WordPress login URL will resemble this:
http://yoursite.com/wp-admin
Tap on the WordPress login link to login to your website dashboard.
Wordpress Theme: Next step is to choose a beautiful theme design as per your blog niche. There are thousands of pre-made WordPress themes that you can install on your site. Some of them are free, while others are paid.
You can change your theme by heading off to your WordPress dashboard and tapping on:
Appearance » Themes
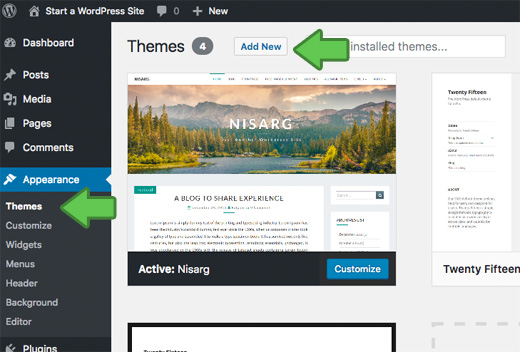
Simply ahead and tap on the Add New button. On the next screen, you will see more than 4000 ready to use free WordPress themes. You can sort them based on industry, most recent and so on.

When you have found the theme that you like, hover over it. You will see an install button. Click it and relax. WordPress will do rest installation. Once done you have to click on "Activate" button to activate theme.
Consider trying the Astra theme if you are looking for a popular option with more flexibility. Despite being only slightly less popular than the default theme, it boasts over 1.6 million users and offers over 180 pre-designed templates that you can readily import and use.
If you're interested in using a different WordPress theme, it's essential to explore your options and find a trustworthy and suitable one for your needs. Keep in mind that configuring a theme requires effort, and not all themes operate similarly. Some themes use a simple text editor, while others use a visual editor or page builder. Changing from one theme to another requires some rework, so it's best to find the ideal WordPress theme for your site before proceeding to the next steps to save yourself the trouble.
You must be now curious How to write your first post on Blog.
To write your first blog post, click on the Posts » Add New menu in your WordPress dashboard.
You will see an editor area where you can write your first Wordpress blog post.

After you hit the Publish button, you can add some “tags” to make it more “searchable”. In other words, if you add some tags, it’s easier to find your blog from the search engines. We will cover this in next series of articles.
To give a glimpse what as a blogger you can expect, here are few topics we will be covering:
As you can see it's not so difficult to create a blog using WordPress. So what are you waiting? Start your blog today. Do share it with your friends & colleagues for initial outreach. If you have any queries or feedback, you can comment below. Please like and share this article with other bloggers. Happy Blogging :)

A Techie, Blogger & Entrepreneur by heart. Rahul Gupta is founder of IndiBlogHub.com platform and build multiple streams of income via Blogging.
© 2019-2025 IndiBlogHub.com. All rights reserved. Hosted on DigitalOcean for fast, reliable performance.