Payment Gateway With Crypto: Add It to Your Checkout in 5 Steps
-

- September 26th, 2026
- 52 views
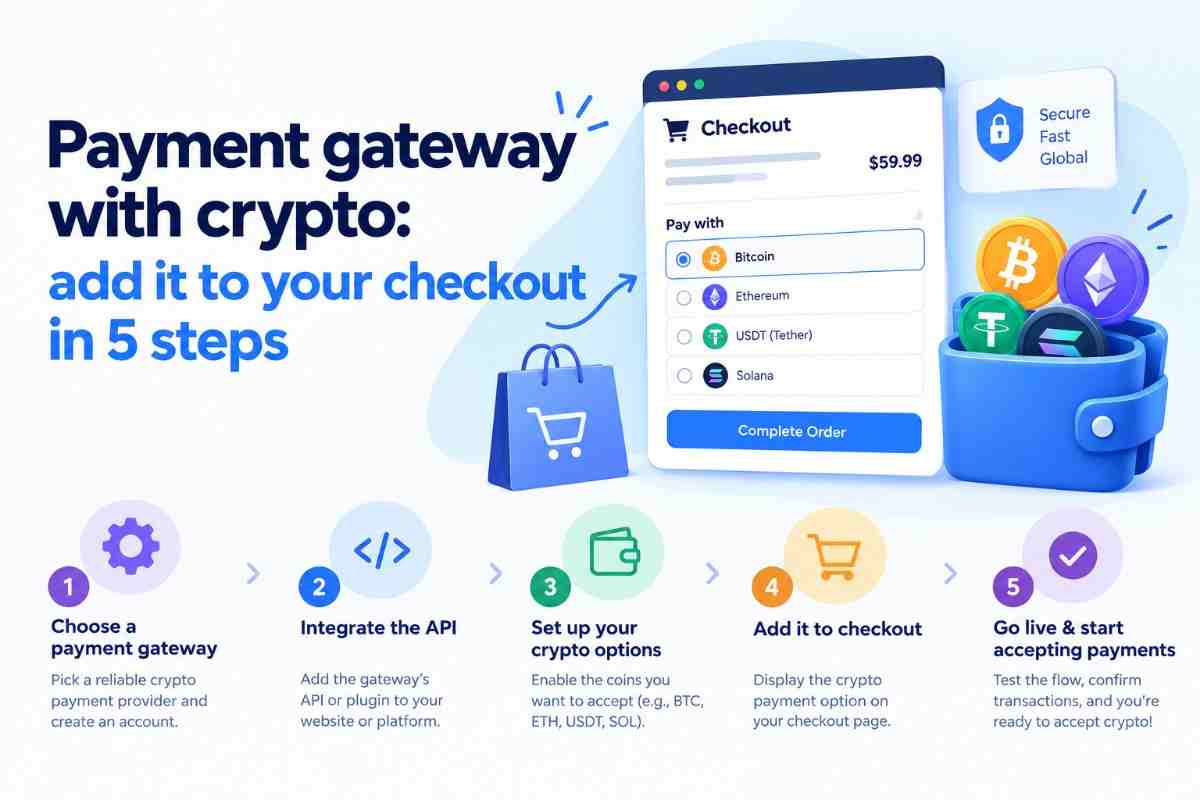
Adding a payment gateway with crypto to your store sounds like a developer project. For most merchants it's closer to a long afternoon. You pick a provider, connect it to checkout, set up one message channel called a webhook, and test. This guide covers Payment gateway with crypto: add it to your checkout in 5 steps, with the numbers and the mistakes that usually trip people up.
The short answer
Choose a gateway and verify your business. Integrate its API or plugin. Set up your coins and payout method. Add crypto to your checkout page. Test, then go live with a small real payment. That is Payment gateway with crypto: add it to your checkout in 5 steps, and the technical work takes hours, not weeks. Account approval is the slow part, and it can take a few days.
Should you add crypto at all?
Be honest before you start. Crypto helps if you sell to buyers in other countries, deal in digital goods or services, fight chargebacks, or already have customers asking for it. It helps less for a local shop where nobody has mentioned it.
Money matters too. Many crypto gateways charge roughly 0.5% to 1% per transaction. US card processors commonly charge around 2.9% plus a fixed fee per sale, and more for international cards. A confirmed crypto payment can't be reversed by the buyer's bank, so chargebacks disappear. The tradeoff is that refunds are manual, and you send them yourself. If those tradeoffs suit you, the rest of Payment gateway with crypto: add it to your checkout in 5 steps is straightforward.
Step 1. Choose a gateway and verify your account
Compare two or three providers on the same terms. Ask for these.
- A complete fee list, including network, conversion, and payout fees
- Supported coins and networks
- Custodial or non-custodial, and what that means for your funds
- Plugin or API quality, and documentation
- Support channels and response time
A custodial gateway receives the money first and pays you later, often after converting to fiat. It's simpler, but your funds sit with the provider until payout. A non-custodial gateway sends payments straight to a wallet you control. You keep the keys, and the risk of losing them. Small merchants usually start custodial.
Send each provider one specific question before you sign up, such as what happens if a customer pays after the invoice expires. A clear answer within a day is a good sign. Silence tells you how a real ticket will go.
Then apply. Expect business verification, sometimes called KYC or KYB, so have your company details, ID, and website ready. Once you're in, turn on two-factor login, whitelist payout addresses if the gateway allows it, and keep API keys in environment variables, never in front-end code or a public repository.
Step 2. Integrate the API or plugin
You have three routes. A plugin is fastest for platforms like WooCommerce. Install it, paste your API keys, and you're most of the way there. A hosted checkout redirects the buyer to the gateway's payment page and needs almost no code. A direct API gives you full control over the design, and more upkeep. Shopify limits some third-party payment methods, so read its current rules or plan on payment links.
Whichever route you pick, create invoices on your server, not in the browser, so a buyer can't edit the amount. The gateway returns a deposit address, a crypto amount, and a locked exchange rate, often valid for 10 to 20 minutes. Everything else in Payment gateway with crypto: add it to your checkout in 5 steps depends on this connection being clean.
Then set up webhooks. These are automatic messages from the gateway to your store. They say a payment was detected, confirmed, or expired. Without them, orders stay unpaid after the customer pays. Follow three rules.
- Verify the signature on every message, so nobody can fake a paid order.
- Make your handler safe to run twice, because gateways retry failed webhooks.
- Respond quickly and do slow work, like emails, in the background.
Step 3. Set up your crypto options
You don't need 300 coins. You need the few your buyers hold. Start with a stablecoin like USDT or USDC, because a 50 dollar order stays a 50 dollar order. Add Bitcoin, Ethereum, or Solana if customers ask.
The network matters more than the coin. USDT runs on several chains, and sending it can cost a few cents or several dollars depending on which one. Cheap networks keep small orders practical. Also check how the gateway handles coins that need a memo or tag, like XRP.
For payout, decide whether you want crypto in a wallet or fiat in your bank. If price swings worry you, choose automatic conversion. Two payouts a month at 5 dollars each is 10 dollars, which matters on a small store.
Then set how many confirmations count as paid. A 15 dollar download can release after one. A 5,000 dollar order should wait for more. Bitcoin blocks average about ten minutes, so six confirmations take roughly an hour, while networks like Tron and Solana confirm in seconds. Write down what happens in messy cases too, because real customers do odd things.
- Underpaid. A wallet took its fee out, so 47 arrived against 50. Ask for the gap, accept a small margin, or refund.
- Overpaid. Refund the extra or issue store credit.
- Expired. The customer paid after the rate window closed. Requote or review by hand.
- Wrong network. Recovery depends on the provider and isn't guaranteed.
- Slow confirmation. Keep the order pending. Don't cancel it.
Step 4. Add it to your checkout
Now show crypto to your buyers. Put it next to your card options as a payment method, and list the coins you accept. When a buyer picks one, show the amount, deposit address, QR code, network, and a countdown for the locked rate.
Name the network in plain words. "Send exactly 50 USDT on the Tron network" prevents more tickets than any help page. Wrong-network payments are the most common mistake. Add a line about refunds too, since they're manual and go back on-chain, usually minus the network fee.
Step 5. Go live and start accepting payments
Use the gateway's sandbox, or a testnet like Ethereum's Sepolia, where coins have no value. Run these cases before real customers touch anything.
- A correct payment
- A payment slightly under
- A payment slightly over
- A payment after the invoice expires
- A duplicate webhook
- A message with an invalid signature
- A cancelled order
One clean test proves only the happy path. It says nothing about a customer underpaying at 2 a.m., which is why Payment gateway with crypto: add it to your checkout in 5 steps ends with a full round of testing, not a quick click.
Then send a real payment of a few dollars. Buy your own product, watch the order flip to paid, and check the payout. Send yourself a refund too, so you know how it works. After that, you're live.
Accounting and tax
Crypto revenue counts as income in most countries, and you'll usually record its value in your local currency at the moment you receive it. Rules on payment providers and stablecoins keep changing, so check local law and ask an accountant. Pick a gateway that exports the hash, order ID, timestamp, amount, and exchange rate for each payment.
Mistakes that slow people down
Skipping the webhook signature check is the worst one. Hardcoding API keys in a theme file is close behind. Others come up often. Merchants offer ten coins when two would do. They forget to name the network at checkout. They set the invoice window too short. They test once and call it done. Avoiding those covers most of Payment gateway with crypto: add it to your checkout in 5 steps.
One more matters a lot. Scammers pose as support staff in messages and social media replies. Real support never asks for your seed phrase or private key. Treat that request as a stop sign.
Where FaradPay fits
FaradPay is a crypto payment provider, so the five steps apply to it as they do to any gateway. Check its coins and networks, fee list, payout terms, integration options, webhook documentation, and support response time against your notes. Then compare it with two other providers. Your own checklist is the fairest way to judge Payment gateway with crypto: add it to your checkout in 5 steps for any name on your shortlist.
FAQ on Payment gateway with crypto: add it to your checkout in 5 steps
How long does setup take? A plugin setup can take a few hours. Business verification can add a few days. A custom API build usually takes several days including testing.
Do I need a developer? Not for a plugin or hosted checkout. For a custom API build, you need someone comfortable with webhooks.
Which coins should I accept first? Start with a stablecoin like USDT or USDC. Add Bitcoin and Ethereum if customers ask.
Do I have to hold crypto? No. Many gateways convert payments to fiat or stablecoins automatically, which limits price swings.
How much does it cost? Many gateways charge roughly 0.5% to 1% per transaction, plus possible network, conversion, and payout fees. Add every fee together before comparing.
Can customers get chargebacks? No. Confirmed blockchain payments are final. You send refunds manually.
Is it legal to accept crypto? In most countries, yes, but licensing, reporting, and tax rules differ. Check local law and ask an accountant.
Final thoughts
You don't need a big project. You need a short coin list, a gateway you've tested, webhooks that check signatures, and a small live payment before real orders arrive. Work through the five steps in order and you can take your first crypto order this week. That's the whole point of Payment gateway with crypto: add it to your checkout in 5 steps.