Everest High Pass Trek Guide: Routes, Risks, and Practical Preparation
-

- March 09th, 2026
- 262 views

👉 Best IPTV Services 2026 – 10,000+ Channels, 4K Quality – Start Free Trial Now
The Everest High Pass Trek is a challenging, scenic high-altitude circuit that links the classic Everest Base Camp path with the Gokyo Lakes and other alpine valleys. This guide explains routes, fitness and acclimatization needs, timing, and safety essentials so readers can decide whether the route matches personal ability and goals.
- Primary intent: Informational
- Typical duration: 16–24 days depending on acclimatization and side trips
- Key hazards: altitude sickness, steep passes (Renjo La, Cho La, Kongma La), unpredictable weather
- Named checklist: C.L.I.M.B. checklist (below)
Everest High Pass Trek: Route, Difficulty, and Timing
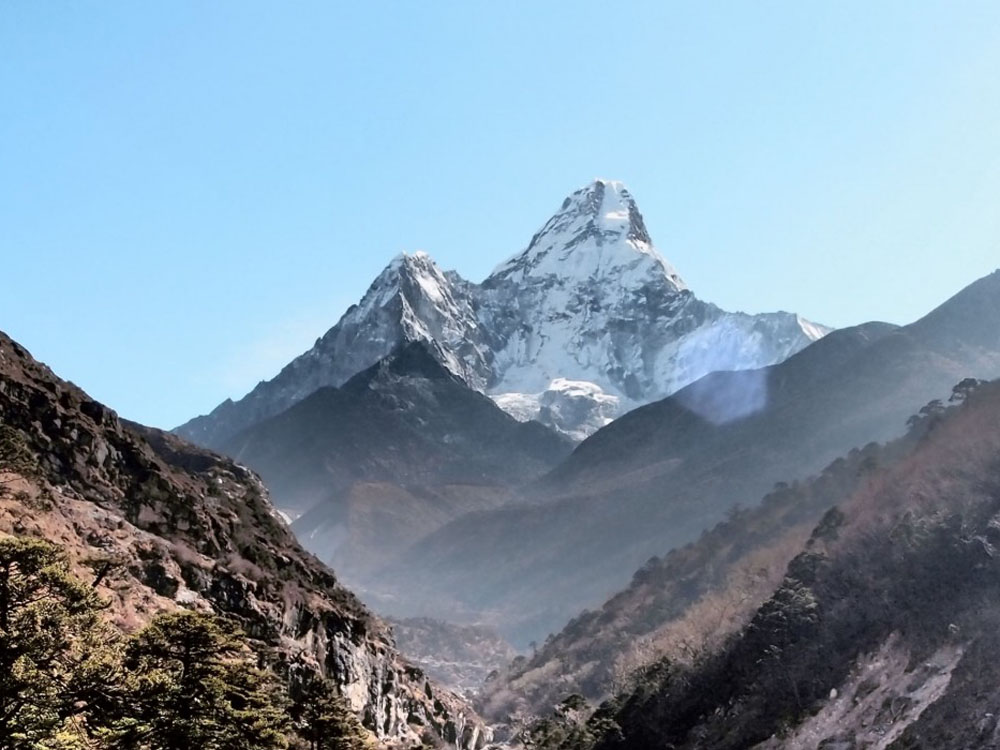
The classic high-pass circuit crosses multiple glacier passes—commonly Renjo La (5,360 m), Cho La (5,420 m), and Kongma La (5,535 m)—and includes stops at Everest Base Camp (EBC), Gokyo Ri, and the Ngozumpa Glacier. Expect exposed sections, rock and ice moraines, and long days of ascent and descent. Several variations exist: some itineraries favor the Gokyo Lakes trek as an Everest Base Camp alternative route to reduce backtracking, while others add a helicopter exit for time-constrained trekkers.
Who this trek is for and key trade-offs
Skill and fitness expectations
Good cardiovascular fitness, experience with multi-day trekking at altitude, and comfort on uneven terrain are required. Technical climbing gear is not necessary for main routes during typical trekking seasons, but crampons and an ice axe may be needed for late-season snow or glacier crossings.
Trade-offs and common mistakes
- Trade-off: Faster itineraries reduce time at altitude but increase risk of acute mountain sickness (AMS).
- Trade-off: Adding Gokyo Ri and its lakes adds scenery but also additional passes and altitudinal gain.
- Common mistake: Underestimating weather variability above 4,500 m; plan extra buffer days.
- Common mistake: Relying only on electronic navigation; carry a physical map and know how to read it.
Key planning elements and high-altitude safety
Effective preparation must combine gradual acclimatization, conservative daily elevation gains, and contingency plans. The World Health Organization and mountaineering bodies recommend staged ascent to lower AMS risk; see the WHO fact sheet on altitude illness for guidance on symptoms and treatment (WHO: Altitude illness).
C.L.I.M.B. checklist (named framework)
- Clothing layers: base, insulating mid-layer, windproof shell, warm hat and gloves.
- Layers for sleep: high-quality sleeping bag rated for sub-zero temps, insulated pad.
- Individual medication: acetazolamide (if prescribed), altitude sickness plan, first-aid kit.
- Mechanical aids: trekking poles, crampons, map/compass or GPS device.
- Buffer days: schedule rest/acclimatization days every 600–800 m ascent or every 3–4 days.
Practical route choices and an example itinerary
One common itinerary starts in Lukla, follows the Everest Base Camp track to Lobuche, then crosses Cho La into Gokyo, ascends Gokyo Ri, returns over Renjo La, and concludes via Phortse or back to Lukla. Example scenario: a 20-day plan that includes three acclimatization days (Namche, Dingboche, and Gokyo) lowers AMS risk and adds photography time at the lakes.
Real-world example
A two-person group took a 21-day window: 3-day approach to Namche, 2-day acclimatization, steady progress to Duglha and Dingboche, a rest day, ascent to Lobuche and EBC side trip, then Cho La crossing to Gokyo, Gokyo Ri sunrise, back over Renjo La, and a safe exit at Phakding. The extra rest day before Cho La made the crossing manageable despite one storm day.
Practical tips for success
- Time the trek: pre-monsoon (March–May) and post-monsoon (late Sept–Nov) offer the most stable weather and clear views.
- Acclimatize: follow the "climb high, sleep low" principle and add buffer days after passes or long altitude gains.
- Hydration and calories: drink 3–4 liters per day and prioritize calorie-dense foods; appetite often decreases at altitude.
- Layer strategy: use moisture-wicking base layers and a reliable windproof outer shell—temperatures swing quickly above 4,000 m.
- Emergency plan: arrange possible helicopter evacuation options for severe AMS or injuries and carry a satellite communicator if traveling off established lodge routes.
Common mistakes and how to avoid them
- Rushing the schedule: reduce daily elevation gain and add planned rest days to prevent AMS.
- Poor footwear: stiff-ankle, broken-in boots reduce blisters and ankle injuries.
- Ignoring local knowledge: hire experienced local guides or consult tea-house hosts on trail conditions and weather updates.
- Underestimating logistics: carry extra cash, copies of permits, and a portable power bank for long stretches without electricity.
Core cluster questions
- How long does the Everest High Pass Trek usually take?
- What are the most difficult passes on the high-pass circuit?
- How should acclimatization days be scheduled for high-altitude treks?
- What gear is essential for crossing Cho La and Renjo La?
- How does the Gokyo Lakes trek compare as an Everest Base Camp alternative route?
Logistics: permits, seasons, and local support
Permits typically include TIMS (Trekkers' Information Management System) and Sagarmatha National Park entry permits—verify latest requirements with local authorities. Hiring local porters or guides reduces altitude risk and supports the local economy; accommodations are a mix of teahouses and basic lodges along the route.
Final checklist before departure
- Completed C.L.I.M.B. checklist, printed route map, and permit copies
- Emergency contact and evacuation plan with local operator
- Acclimatization schedule with at least two buffer days
- Warm sleeping system and daytime layering strategy
Frequently asked questions
How high are the passes on the Everest High Pass Trek and is technical climbing required?
Passes range roughly 5,300–5,535 m. Standard routes do not require technical roped climbing but may need crampons and ice axe in snowy conditions; plan for snow travel on shoulder seasons.
When is the best time to do the Everest High Pass Trek?
Late spring (March–May) and autumn (late September–November) provide the most stable weather and visibility. Winter increases technical difficulty due to deep snow; monsoon months bring heavy precipitation and cloud cover.
What medical concerns should be planned for high-altitude trekking?
Acute mountain sickness (AMS), dehydration, and hypothermia are primary concerns. Follow staged ascent, carry first-aid meds, and know evacuation procedures. See WHO guidance on altitude illness for symptoms and treatment options (WHO).
What are effective training steps for the Everest High Pass Trek?
Build aerobic endurance, stair-climbing capacity, and load-bearing experience by hiking with a weighted pack at increasing elevations if possible. Include interval training and multi-hour walks to simulate long trekking days.
Is the Everest High Pass Trek suitable as an Everest Base Camp alternative route for more scenery?
Yes. Combining the Gokyo Lakes trek with the high passes creates a compelling Everest Base Camp alternative route that adds dramatic alpine lakes, glacier views, and lesser-crowded vistas—but it increases technical difficulty and altitude exposure.